Bluemix UI Updates: Bluemix & Watson Logos

We’re pleased to announce another round of Bluemix UI updates. This refresh is especially exciting as we welcome IBM® Watson™ services to the Bluemix Catalog. With this addition, you can now rapidly prototype and build cognitive apps in the cloud!

Along with Watson, we’ve made a number of other major improvements since our August release. These include:

  • Upgrade of three services from beta to general availability: Business Rules, Delivery Pipeline, and MQ Light
  • Update of the Cloud Integration add-on, including the ability to create private services
  • Tighter integration of organizations and spaces into the Dashboard
  • Addition of blog and Twitter feeds to the Bluemix landing page
  • Single sign-on with Bluemix Documentation to provide more personalized sample code snippets
  • Numerous usability improvements and bug fixes

Bluemix UI Updates: Watson Comes to Bluemix

MIO Alpha I Strapless Continuous Heart Rate Monitor

Some of my peers in IBM’s Emerging Technology group have been creating some really cool Internet of Things (IoT) demos using IBM Bluemix. Two of them, HR Tracker and Race Tracker, are geared toward fitness and activity tracking. They are both capable of displaying the heart rate and geolocation of exercisers as the values change in real-time. In this post, I’ll describe both sample apps and give an overview of the technology used to build them.

HR Tracker

Last month, I got to be part of an HR Tracker demo at That Conference 2014. For my part, it was a pretty simple process. First, I installed the demo app on my iPhone. Then, I strapped on a brand new, wrist-worn MIO Alpha I Strapless Continuous Heart Rate Monitor, turned it on, and paired it with the phone via Bluetooth. Finally, I hit the Start button in the app. And, before I knew it, a new icon popped up in colleague Mark VanderWiele’s browser showing my heart rate and position. Pretty cool!

HR Tracker Screenshot

And, even cooler, as my heart rate changed on the MIO Alpha, I could see it update almost immediately in the web app.

HR Tracker Screenshot

At this point, I went out for a short walk. While I was gone, Mark could see exactly where I was and how “hard” I was working (via heart rate) in the parking lot and side streets around the Kalahari Resort.

Race Tracker

Race Tracker is similar to HR Tracker, but is geared more toward monitoring data for lots of participants in an event. This morning Bryan Boyd took part in the Medtronic Twin Cities Marathon up here in Minnesota. Of course, running a marathon is way on the other side of the intensity spectrum from my little walk. :)

Via the Race Tracker app (written mostly by Bryan), I was able to “watch” his progress during the race. The animated GIF below (sped up to reduce size) shows Bryan’s data updating at he crossed the 20-mile point (on the St. Paul side of the Mississippi River):

Race Tracker w/ Bryan Boyd in Marathon

I then switched to the satellite view and caught him still going strong at Mile 21:

Race Tracker w/ Bryan Boyd in Marathon (Satellite)

Race Tracker can also send notifications at pre-determined intervals. For example, the tweet below came through the feed as Bryan reached 24 miles:

So, did Bryan finish? I wish I knew! Around Mile 25, data updates stopped being shown in the web UI. I’m assuming his heart kept beating. So, did the battery on his phone or heart rate monitor run out? Once I find out, I’ll try to post an update. :)

Update: I heard from Bryan, and his heart is indeed still beating. He blamed the glitch on “developer error.” But, as a fellow developer, I know those things happen with prototypes. :) Oh, and by the way, Bryan also finished the race in a very respectable 3:57.

Technology

On the day I tried HR Tracker, Mark conducted a session called From Concept to Operation in 30 minutes Using Services and a PaaS. During his talk, he went through the steps needed to build a Bluemix-based backend for these apps. It was a great demonstration of how quickly the “next big idea” can be prototyped and delivered to run on Bluemix.

Architecturally, MQTT ties all of the components together. Every piece either publishes or subscribes to an MQTT Broker (in this case powered by IBM MessageSight). So, for example, when the iPhone app detects a change in heart rate or GPS position, it publishes a message with that information to the MQTT Broker. The MQTT Broker in turn sends the messages to all subscribers.

As you might have guessed, the Bluemix-based backend is a subscriber. Mark started by creating a new app in the Bluemix UI from the Internet of Things Starter boilerplate. The resulting app runs a Node-RED server and is automatically bound to a new instance of the Cloudant NoSQL DB service. With NODE-Red, you can graphically create a flow that subscribes to an MQTT Broker and takes appropriate action. In this case, it acts by writing the information to the Cloudant DB and by sending a tweet if the runner has crossed a mile marker. So, in just a few minutes you can have a Bluemix app processing IoT data from a large number of devices and putting that data right into a database for later retrieval and analysis.

And, in case you’re wondering, the map UI also subscribes to the messages and updates the display as new information arrives.

What’s Next?

Since data is stored as it comes in, all sorts of additional features are possible. The Emerging Tech team already has code in HR Tracker to allow people to “replay” past activities or to compete against themselves (or others) on previous routes.

They’ve also begun exploring interesting things that could be done by applying analytics to all of this data. For example, did someone cheat? Does data indicate someone was grabbing the side of a car for half of their so-called bike ride?

With that, I’ll close with a question to anyone who has made it this far in the post. And, I’d love to see some responses in the comments section. :)

Question: If you had access to all of the data generated by this IoT scenario, what would you be interested to find out?

Bluemix UI: SSL Certificates for Custom Domains

In my previous post Redirecting HTTP to HTTPS with Node.js & Express on IBM Bluemix, I described how you automatically get basic SSL support if you use the default domain when configuring your apps to run on IBM Bluemix. However, if you use a custom domain, you’ll get domain mismatch errors in the browser. These errors are ugly and likely to scare away users. In this post, I’ll show you how to fix this problem by associating your own SSL certificate with your custom domain. This new functionality went live in the August 2014 refresh of the Bluemix UI. Along the way, you’ll learn how to do the following:

  1. Add a custom domain.
  2. Setup an app to use the custom domain.
  3. Configure DNS so traffic is routed to your app.
  4. Upload an SSL certificate for your domain. NOTE: There is a limit of one upload per organization for trial users and four uploads per organization for pay-as-you-go and subscription users (updated Dec. 7, 2014).

Prerequisites

Before we get into the more fun part of the post, let’s cover some important prerequisites that will make things go more smoothly along the way. In particular, you will need to:

  1. Have (or acquire) ownership of a registered Internet domain name
  2. Obtain (or create) an SSL certificate, private key, and (optionally) an intermediate certificate

I’ll say more about these requirements in the next couple of sections.

Registered Domain Name

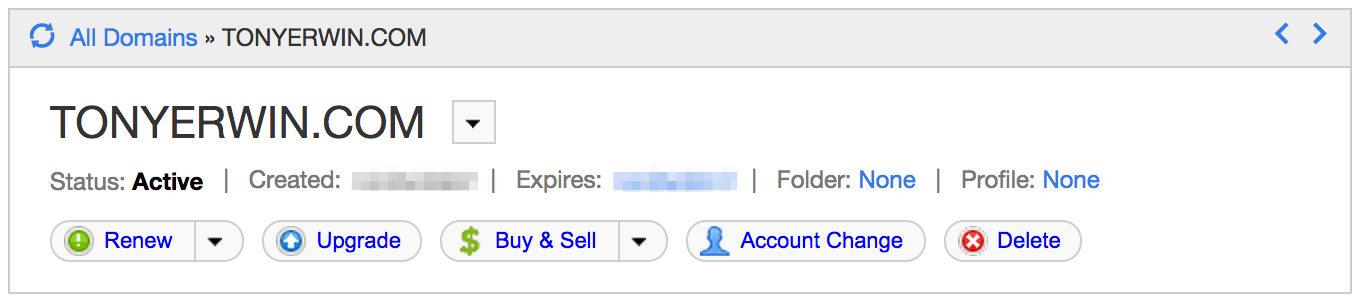
We will be creating a custom domain in Bluemix, and for it to function properly, you will need to own the domain name that you plan to use. In addition, it must be registered with a DNS hosting service that allows you to make configuration changes. For example, I own the tonyerwin.com domain (which points at the blog you’re reading right now) and use GoDaddy for DNS hosting. (NOTE: GoDaddy is just one of many suitable providers.)

GoDaddy Domain Dashboard

Even if you don’t own a domain or have access to your DNS provider, you can still explore the functionality in this article. But, you will have to edit your hosts file. I’ll say a little more about that option later on in the Configuring DNS for Custom Domains section.

SSL Certificates

What If I Don't Have a Certificate?

So, you want to try this cool feature out, but you're not ready to purchase a certificate from a certificate authority? If so, self-signed certificates could be a good option for you. While not appropriate for production apps, they do have a place during development. Check out my companion post which describes three different ways to create self-signed certificates: Generating Self-Signed SSL Certificates for Use with Bluemix Custom Domains.

When it comes time to associate a certificate with your domain, you will need the following files with the noted attributes:

  • Certificate
    • Digital document that binds a public key to the identity of the certificate owner, thereby enabling the certificate owner to be authenticated.
    • Generally issued and signed by a certificate authority. However, for testing and development purposes you may use a self-signed certificate.
    • File types supported:
      • PEM (.pem, .crt, .cer, and .cert)
      • DER (.der or .cer )
      • PKCS #7 (.p7b, .p7r, .spc)
        • Limitation: Bluemix supports only one certificate per file. That is, you cannot bundle a certificate and intermediate certificate into one PKCS #7 bundle.
  • Private key
    • Algorithmic pattern used to encrypt messages that only the corresponding public key can decrypt. The private key is also used to decrypt messages that were encrypted by the corresponding public key.
    • File types supported:
      • PEM (.pem, .key)
      • PKCS #8 (.p8, .pk8)
  • Intermediate certificate
    • You should use an intermediate certificate to verify the authenticity of the main certificate. Intermediate certificates are typically obtained from a trusted third-party. You might not require an intermediate certificate if using a self-signed certificate for testing your application prior to deploying it to production.

See the Uploading SSL Certificates article in the Bluemix Documentation for the most current information on supported certificate types.

Adding a Custom Domain

What If I Already Have a Custom Domain?

You may already have a custom domain configured for Bluemix. If so, great! But, please pay attention to the upcoming section on Configuring DNS for Custom Domains as there are some special DNS setup considerations for SSL.

Now that we have the prerequisites out of the way, let’s start by adding a custom domain via the Bluemix UI. (NOTE: You can also create domains with the cf command line tool.)

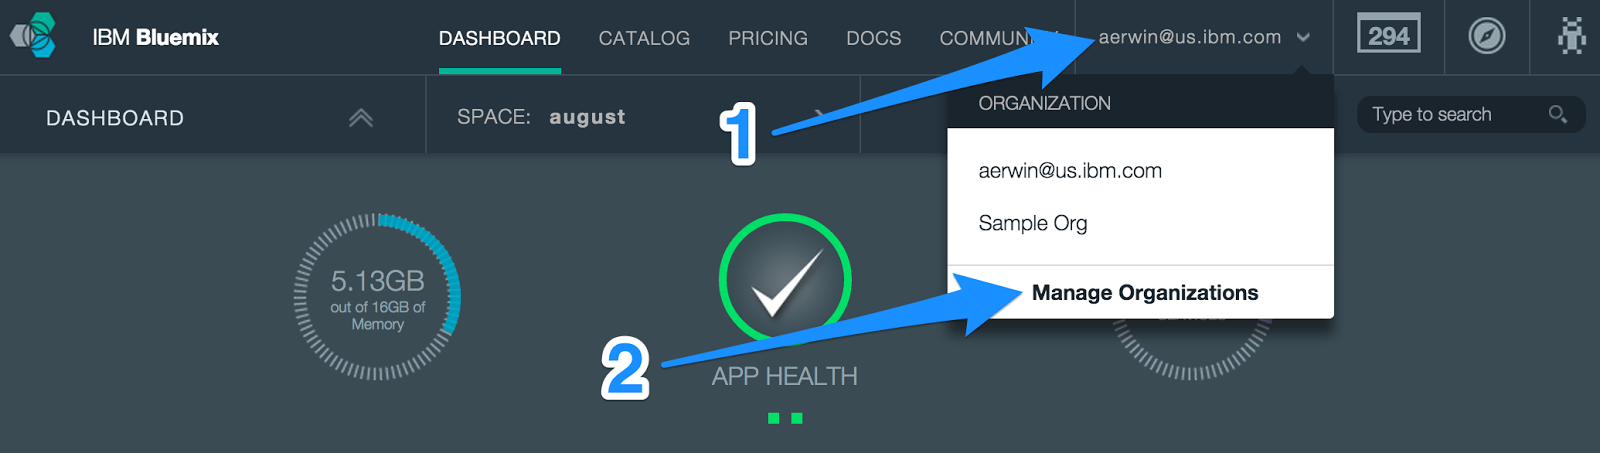
  1. Log in to the Bluemix UI.
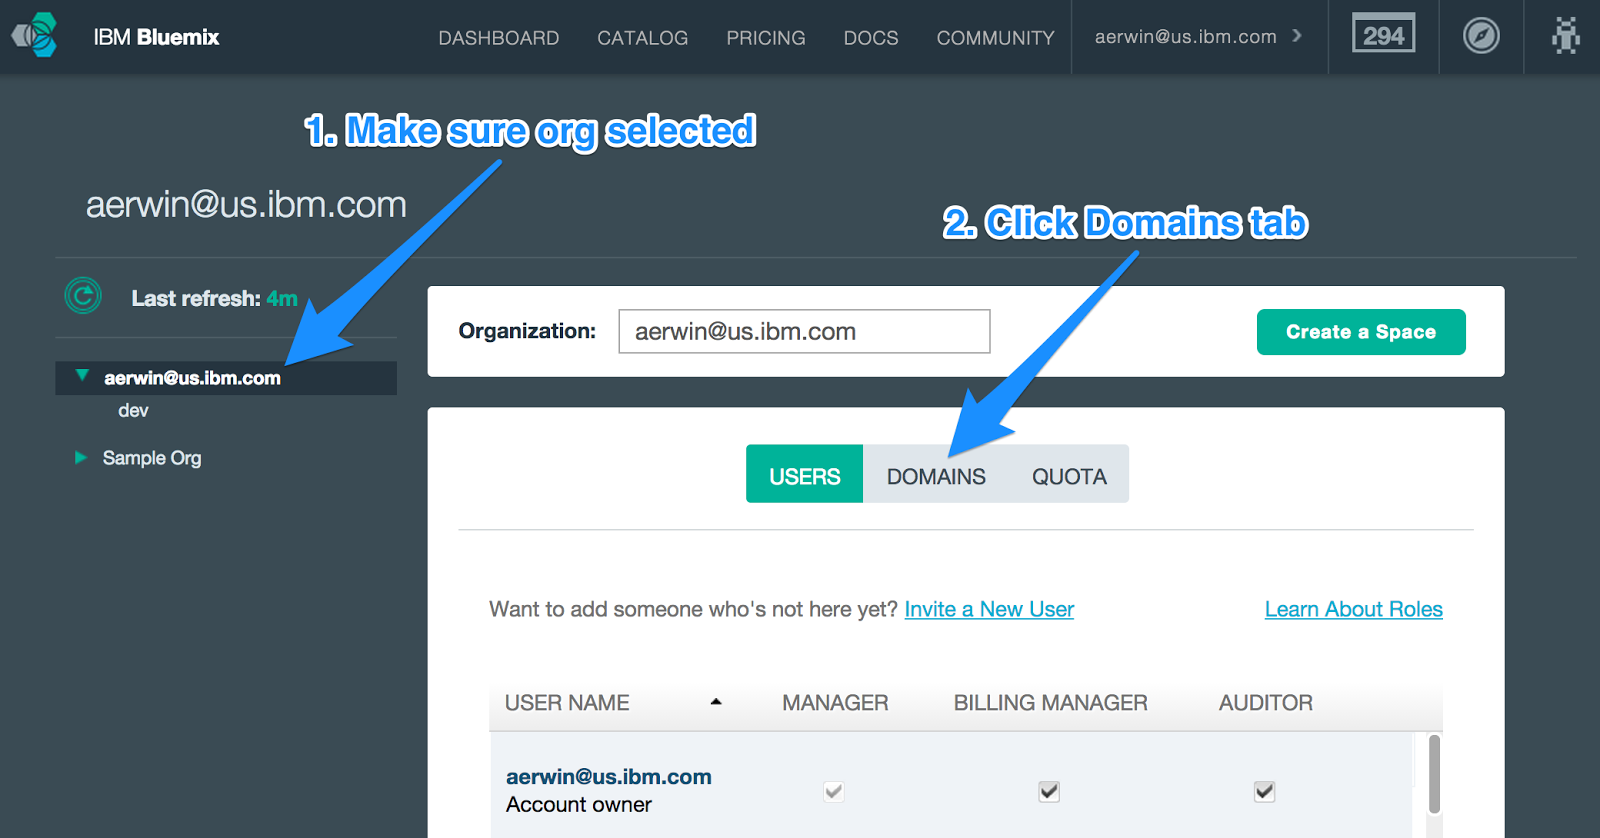
  2. In the banner, open the Organizations menu and choose Manage Organizations.

Bluemix UI: Select Manage Organizations from Banner

  1. In the Manage Organizations pane, make sure your organization is selected in the tree on the left side. Then, click Domains to view the custom domains for your organization.

Bluemix UI: Manage Organizations Top-Level

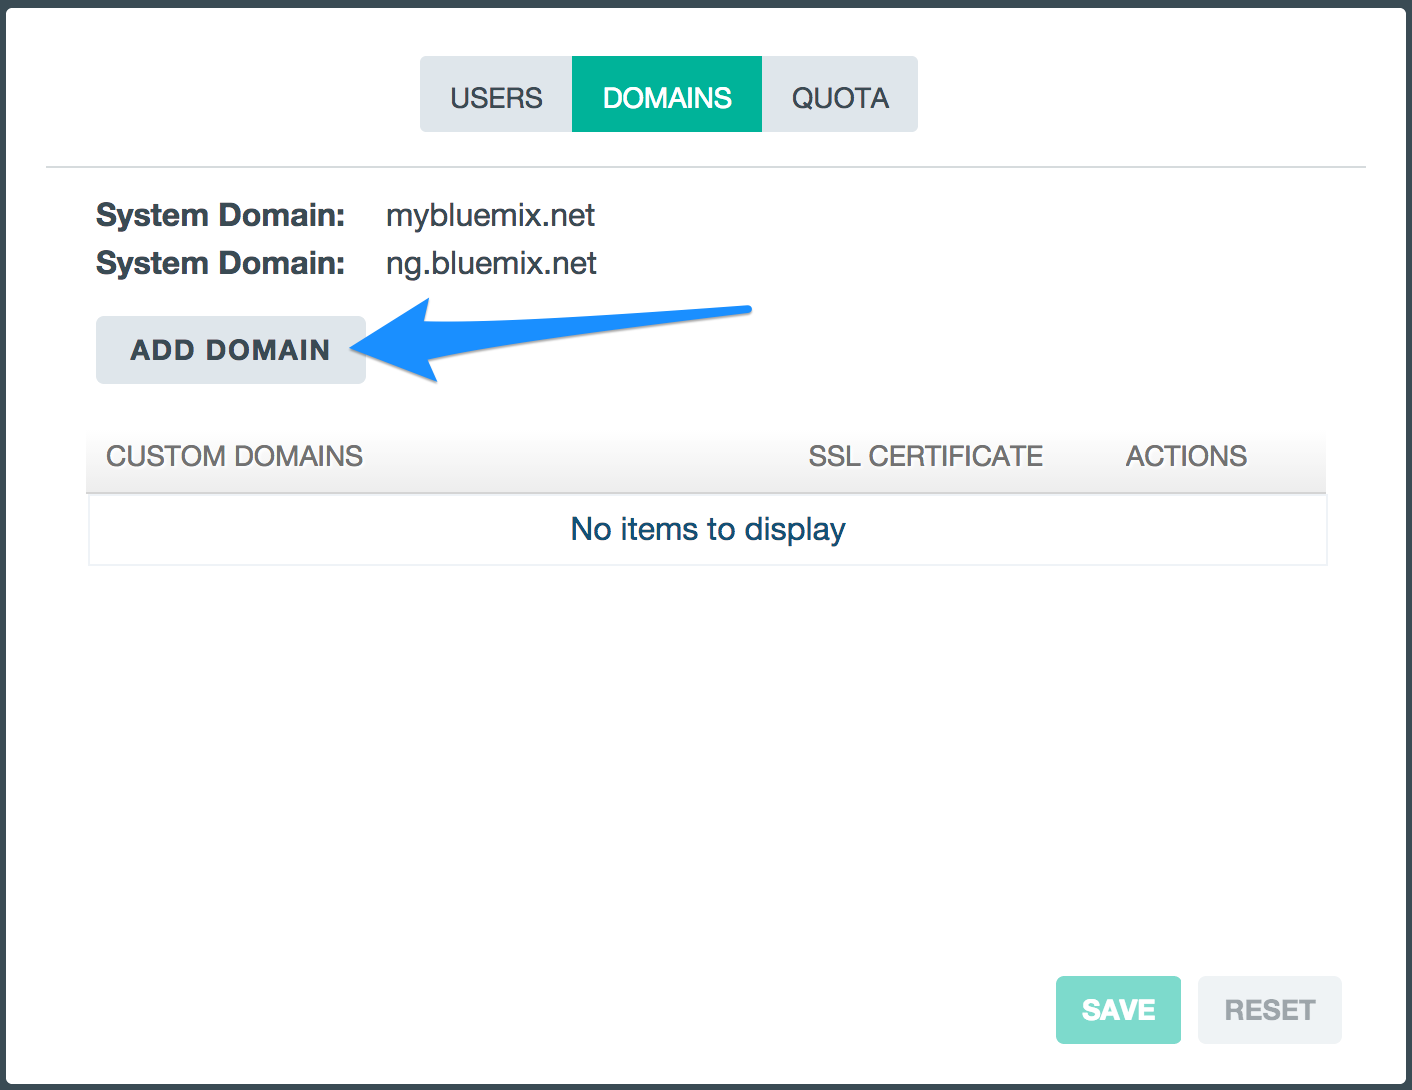
  1. On the Domains tab, click the Add Domain button.

Bluemix UI: Manage Domains

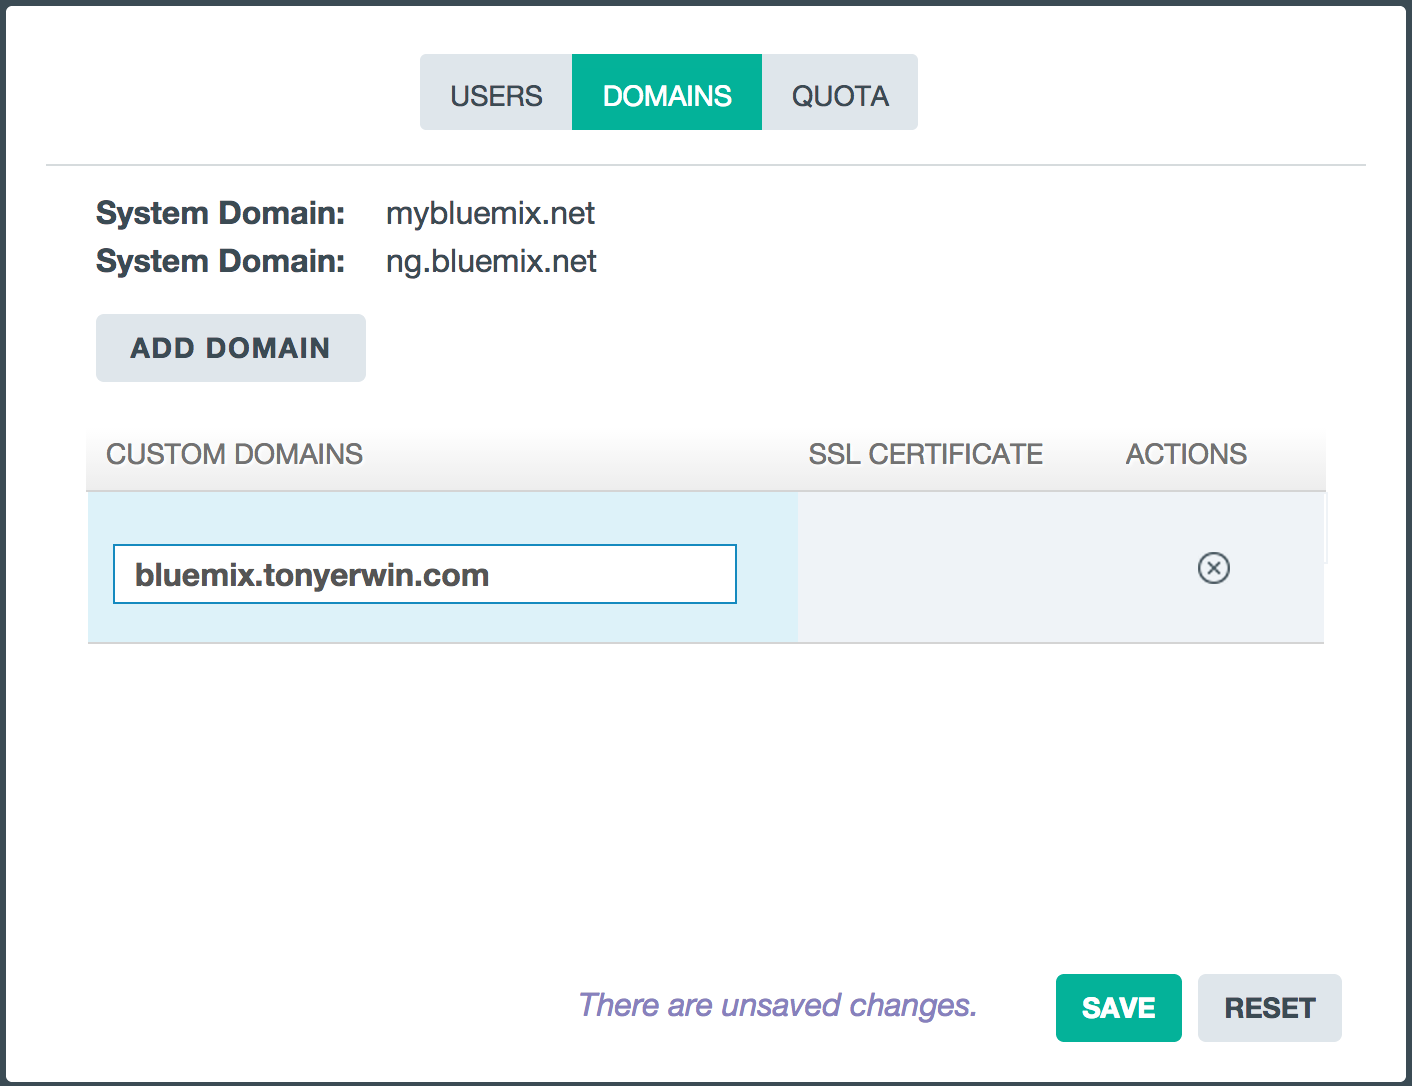
  1. Enter your custom domain in the text box in the newly added row. As mentioned earlier, this should be a domain that you own and that is registered with a DNS hosting service. For my custom domain, I own the tonyerwin.com domain, and I want to use the bluemix.tonyerwin.com domain for my demo apps that will be deployed to Bluemix.

Bluemix UI: Adding Custom Domain

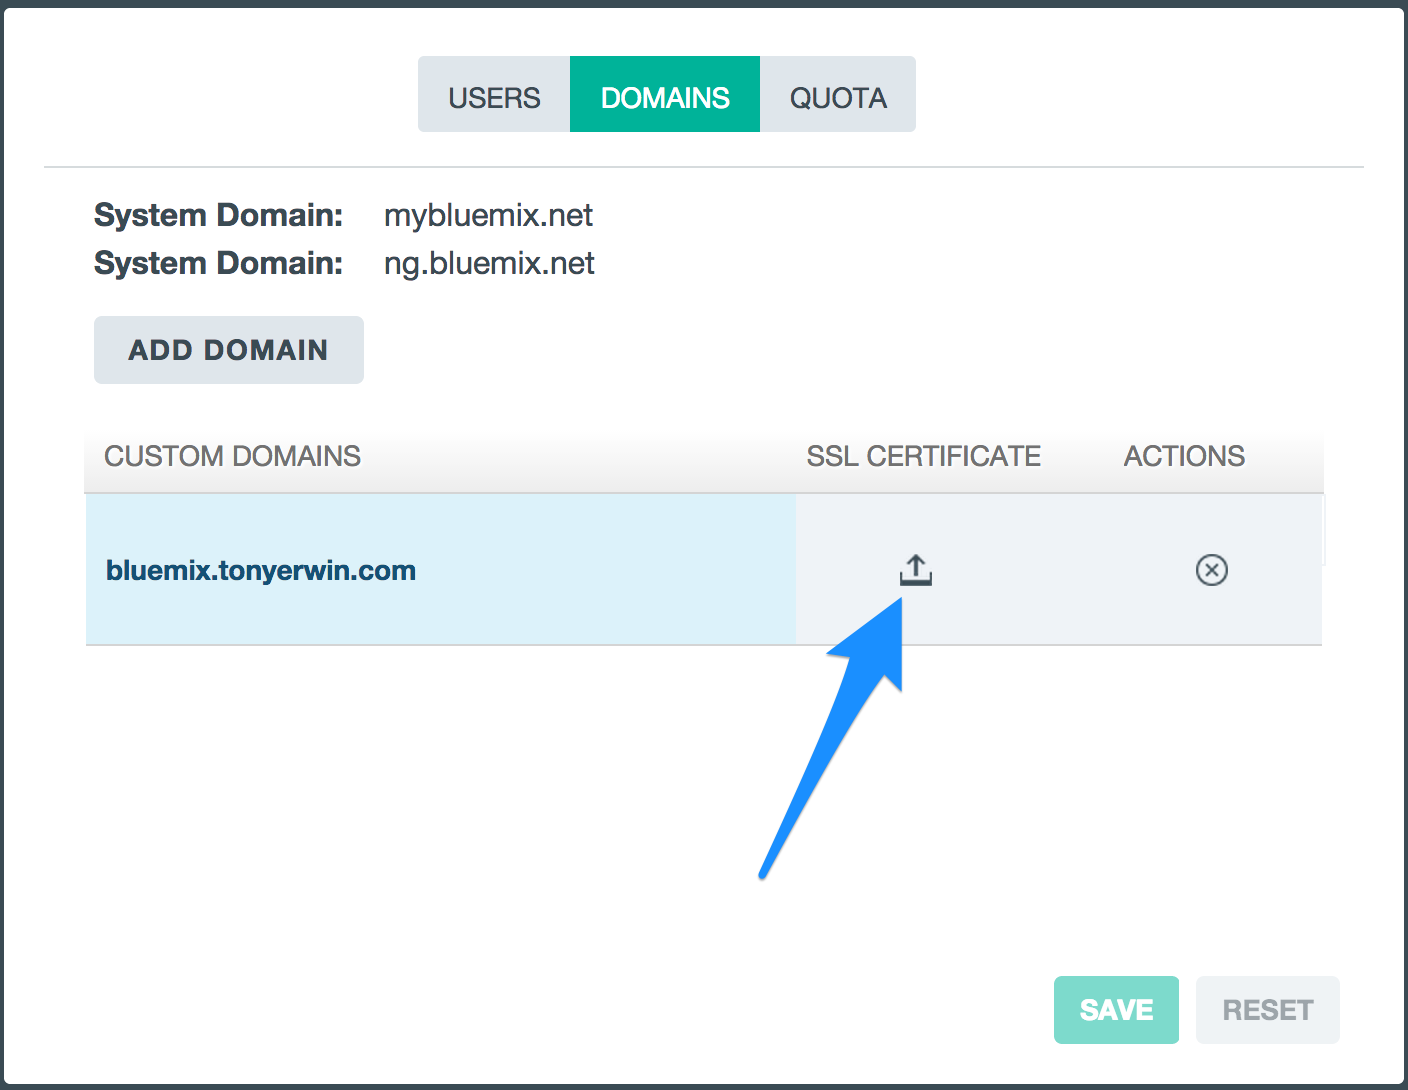
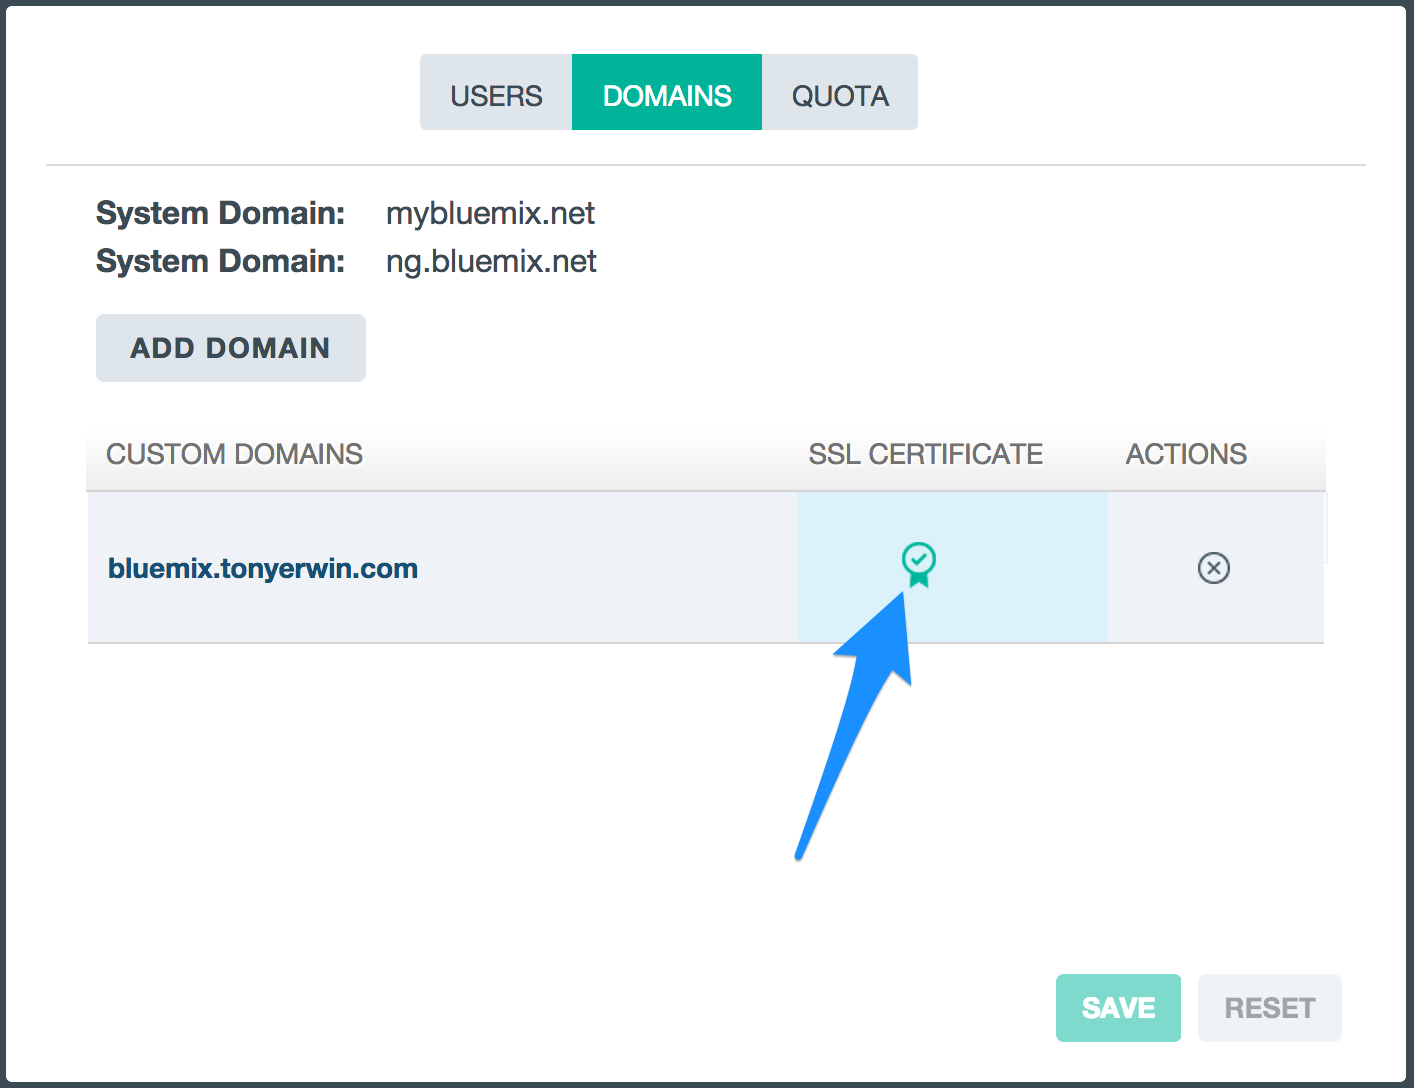
  1. Click the Save button. After the save operation completes, you should notice a new icon in the SSL Certificate column. We’ll come back to it later, but clicking this icon is how you would start the process of uploading a certificate for your domain.

Bluemix UI: Custom Domain Added

Using a Custom Domain in an App

Now, that we have a custom domain, let’s setup an app that makes use of it. We can either create a brand new app or edit the routes of an existing app. And, in the rest of this section, I’ll walk you through both paths.

Creating a New App With a Custom Domain

If you want to create a brand new app, do the following:

  1. Click on the Catalog in the Bluemix UI banner.
  2. In the Starters section, click on one of the runtimes like Liberty for Java™, SDK for Node.js™, Ruby on Rails, or Ruby Sinatra.
  3. On the details page for the selected runtime:
    • Enter a Name for your application.
    • Optionally change the default Host.
    • From the Domain pulldown, select your custom domain.
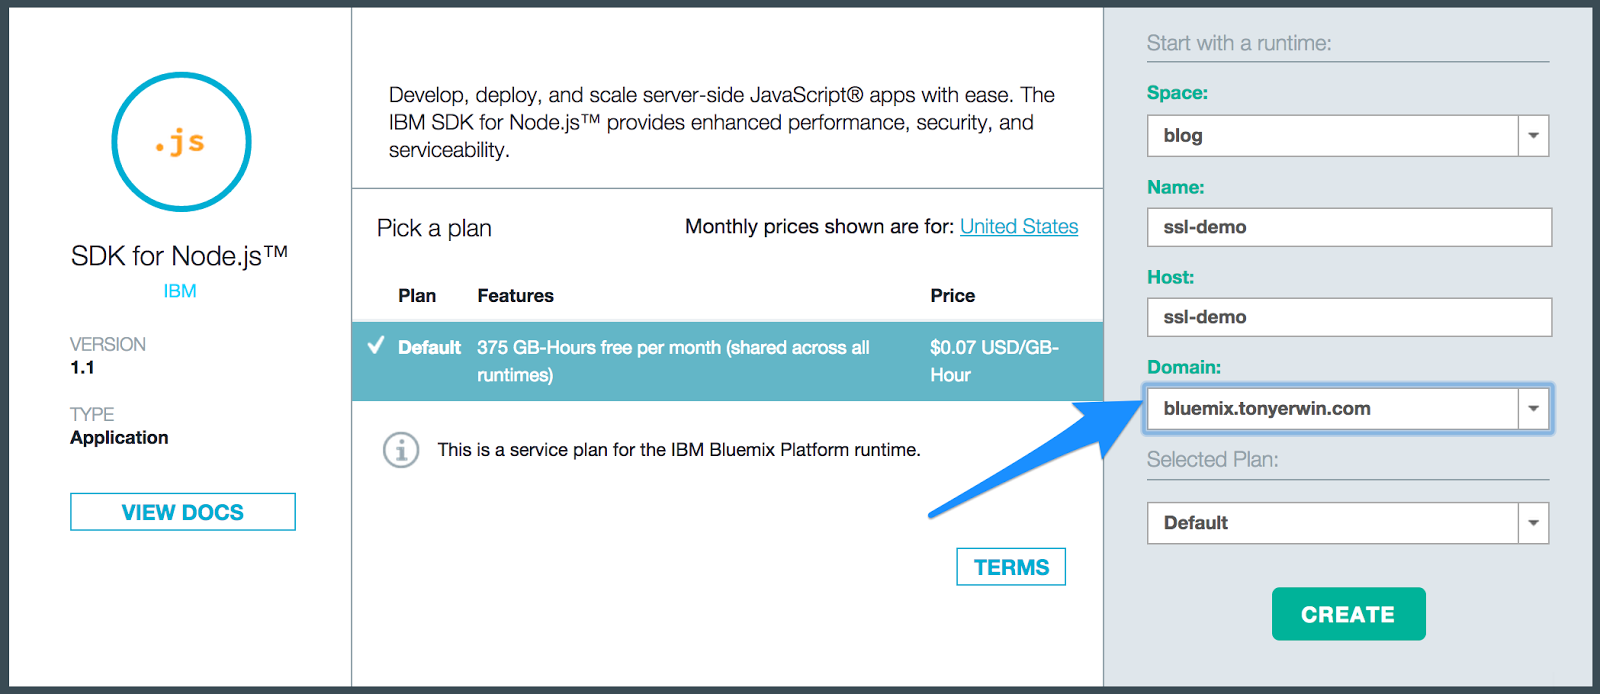
Creating Starter App With Custom Domain

  1. Click the Create button to create your app. After creation, you will be taken to the App Details view of your new app.

Editing Routes of an Existing App to Use a Custom Domain

If you prefer to edit the route of the existing app, follow the steps below:

  1. Go to the App Details view for your app. If you created your app in the last section, you’re probably already there. Otherwise, find your app in the Dashboard and click on it.

Bluemix UI: App Details Showing Same App With Gear Menu

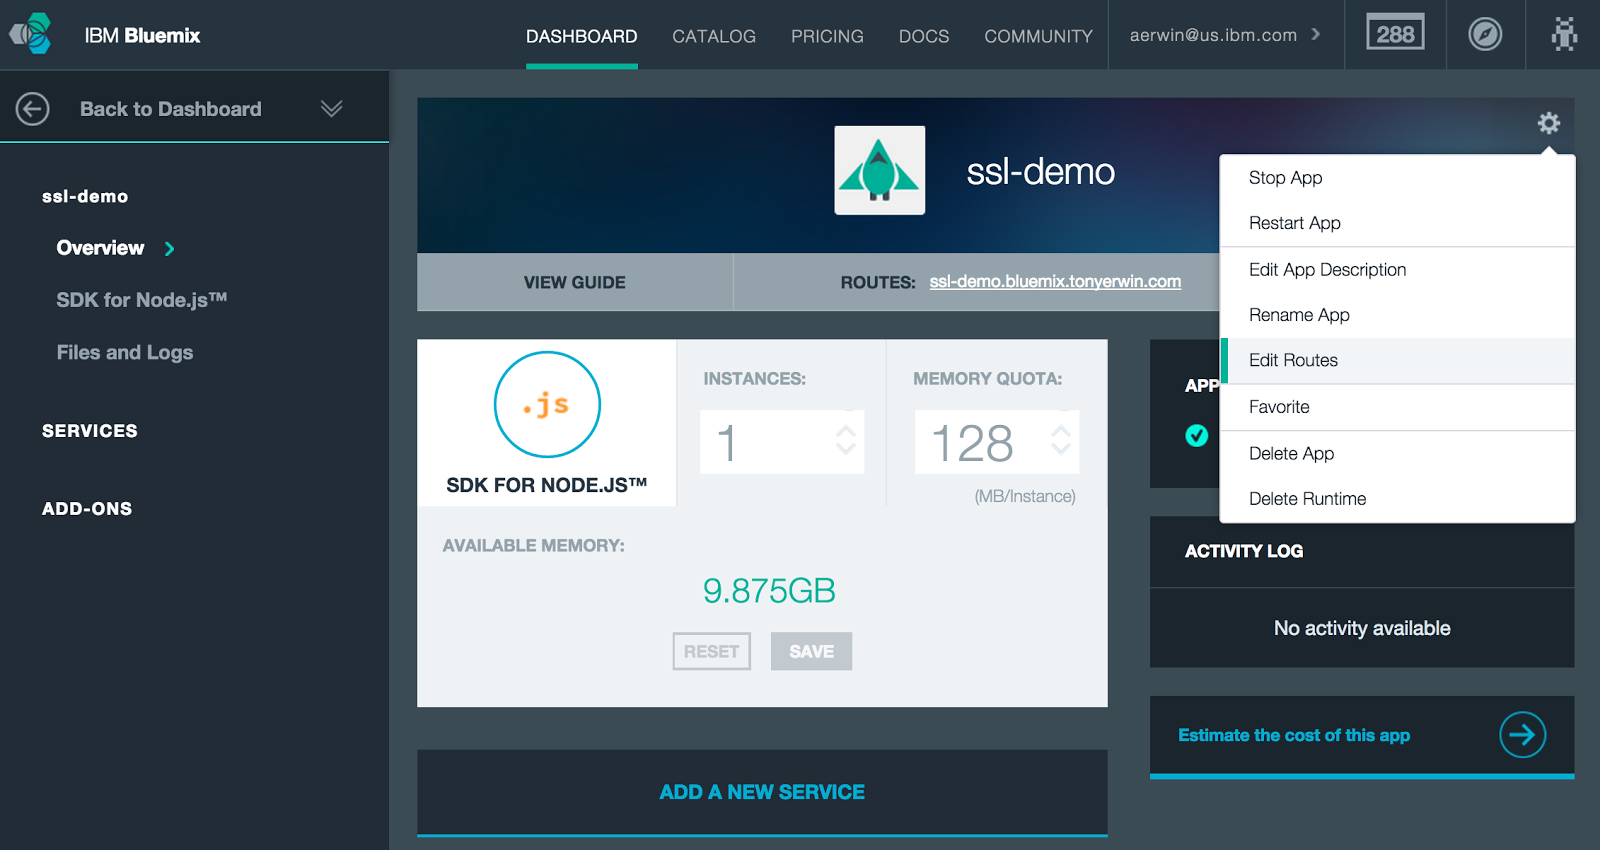
  1. Open the “gear” menu in the upper right hand corner of the App Details view, and choose the Edit Routes menu item.
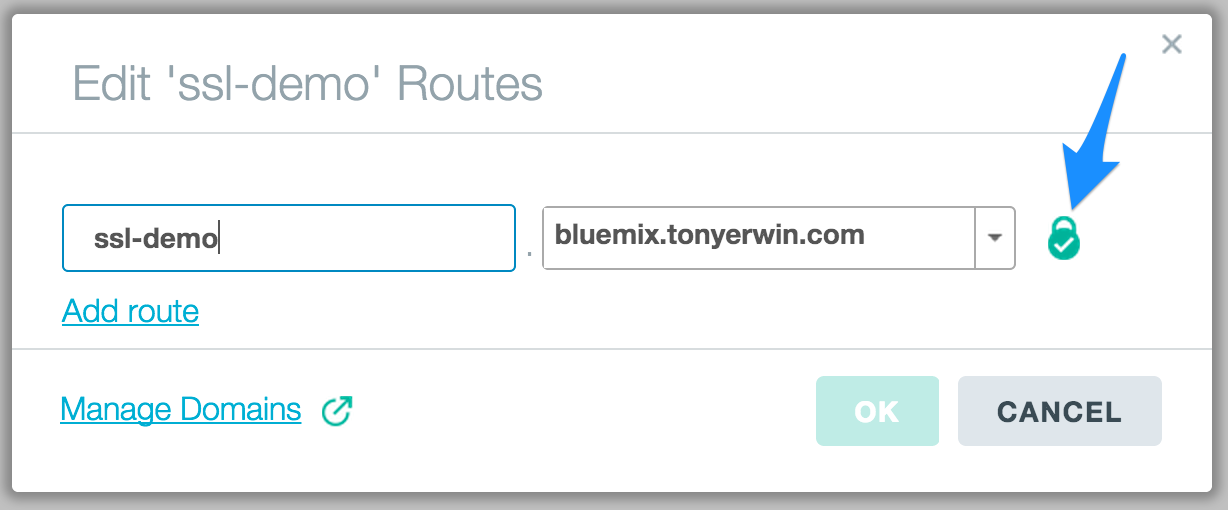
  2. In the Edit Routes dialog, you can add and remove routes. In addition, each route offers a pulldown that includes all available domains and allows you to choose any of your custom domains.

Edit Route Dialog Before SSL Cert Upload

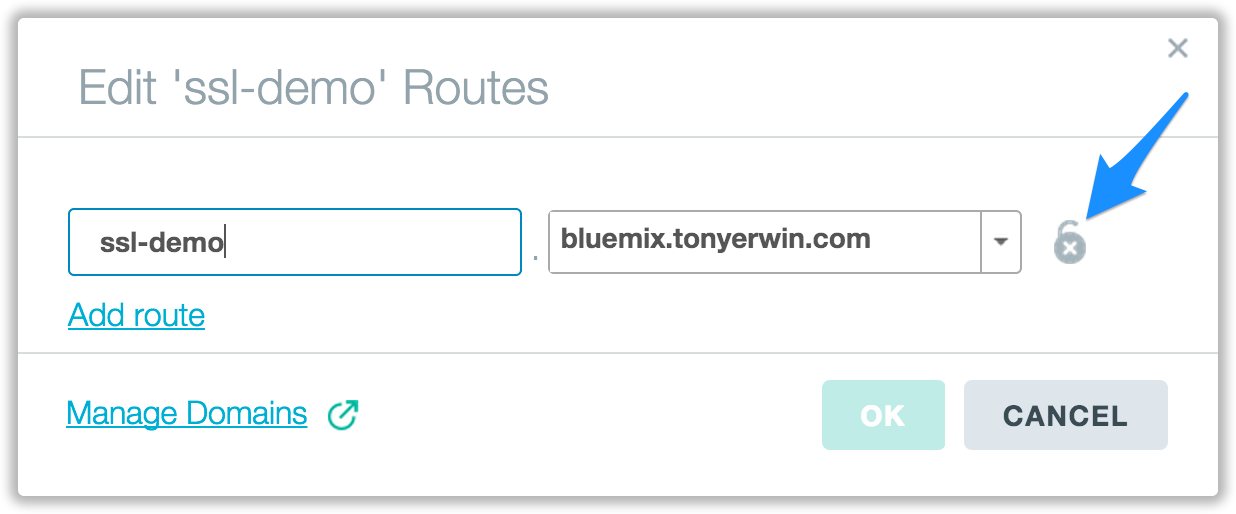
  1. Notice in the screen shot above that my app has one route, ssl-demo.bluemix.tonyerwin.com. Also, note that the SSL status icon to the right of the route shows an open padlock. This indicates we have not yet uploaded an SSL certificate for the route’s domain.

Configuring DNS for Custom Domains

What if I Don't Own a Domain?

You may still wish to experiment with this functionality even if you don't own a domain or have access to your DNS provider. An option for you would be to edit your `hosts` file. The mechanism for doing this will depend on your operating system, but in the end you'll want to add an entry like one of the following for your app's route:
# For an app running in Dallas 
# (ip from running nslookup on
#  secure.us-south.bluemix.net)
75.126.81.68 www.example.com
OR
# For an app running in London
# (ip from running nslookup on
#  on secure.eu-gb.bluemix.net)
5.10.124.142 www.example.com
OR
# For an app running in Sydney
# (ip from running nslookup on
#  secure.au-syd.bluemix.net)
168.1.35.166 www.example.com

At this point, we have an app using a route making use of our custom domain. However, if you tried to access your app via the route, it would fail. To resolve this, you need to do some DNS configuration. Specifically, you need to add a CNAME record that maps your domain to the hostname of the Bluemix router. Since we plan to use our own SSL certificates, the hostname we want to reference is secure.us-south.bluemix.net. NOTE: The host to use varies by the region your app is hosted in:

  • US South: secure.us-south.bluemix.net
  • US Easty: secure.us-east.bluemix.net
  • London: secure.eu-gb.bluemix.net
  • Frankfurt: secure.eu-de.bluemix.net
  • Sydney: secure.au-syd.bluemix.net

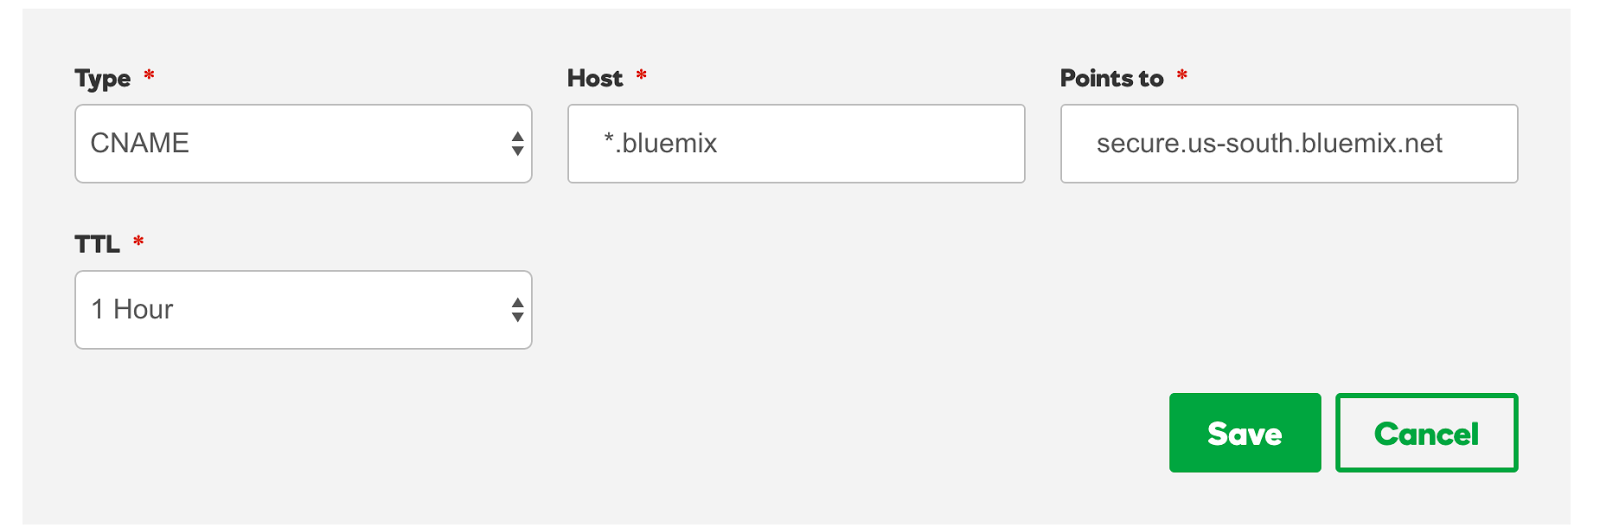
The mechanism for adding a CNAME record is going to vary depending on your provider. For GoDaddy, it’s rather simple. I go to the DNS Management configuration page for my tonyerwin.com domain. From there, I click the Add button. This brings up a panel like the one in the screenshot below. On it, I’ve set Type to CNAME, the Host to *.bluemix (the tonyerwin.com part is assumed), and Points to to secure.us-south.bluemix.net.

GoDaddy Add Record Dialog

If you don’t use GoDaddy, you should still find a similar mechanism from your provider. Once you commit these kinds of changes, you will have to wait some period of time for the changes to propagate. Once they do, you should be able to access your app via the browser.

If you’re still unable to access your app after a reasonable amount of time, you might find it helpful to run nslookup. For example, I ran it below for ssl-demo.bluemix.tonyerwin.com, and it properly resolved to secure.us-south.bluemix.net.

$ nslookup ssl-demo.bluemix.tonyerwin.com
Server:  192.168.1.1
Address: 192.168.1.1#53

Non-authoritative answer: ssl-demo.bluemix.tonyerwin.com canonical name = secure.us-south.bluemix.net.
Name: secure.us-south.bluemix.net
Address: 75.126.81.68

Uploading a Certificate for Your Domain

Revisiting the Need for Your Own Certificate

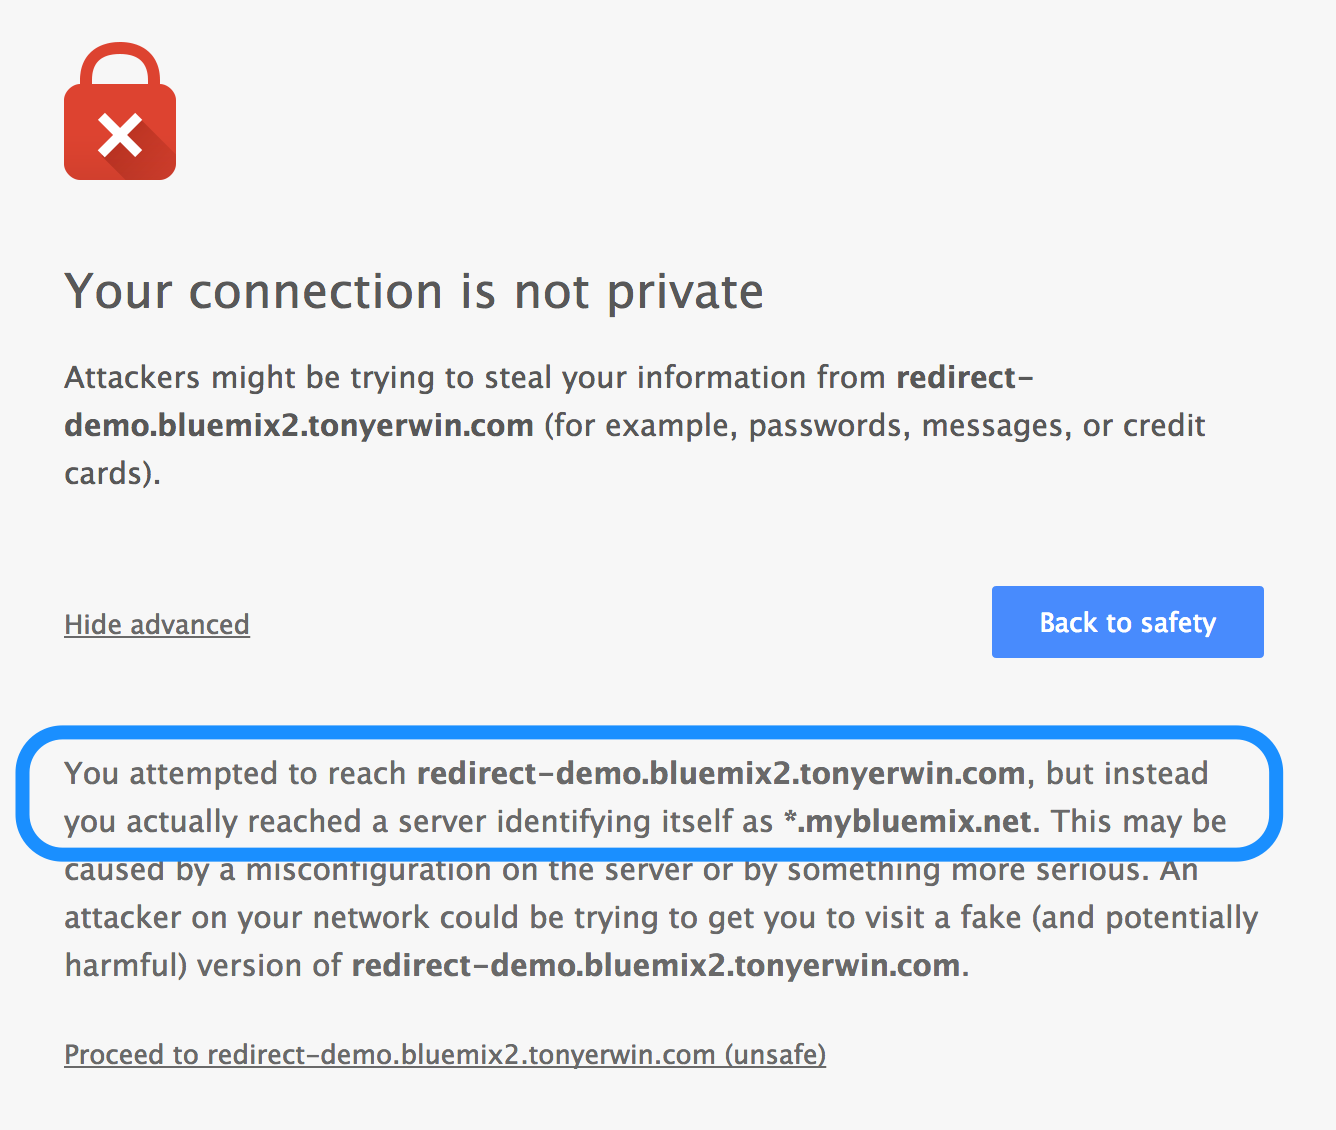
We’re now at a point where you can access your app in the browser using a route that includes your custom domain. But, if you try to access it using the https protocol, you’ll get a browser warning. You can try this for yourself using the link to one of my apps below:

If you follow that link, your browser is going to report that you can’t trust the identity of the server because it identifies itself as *.mybluemix.net rather than the domain in the URL. For example, here’s what I see in Chrome:

Security Warning in Chrome With Custom Domain

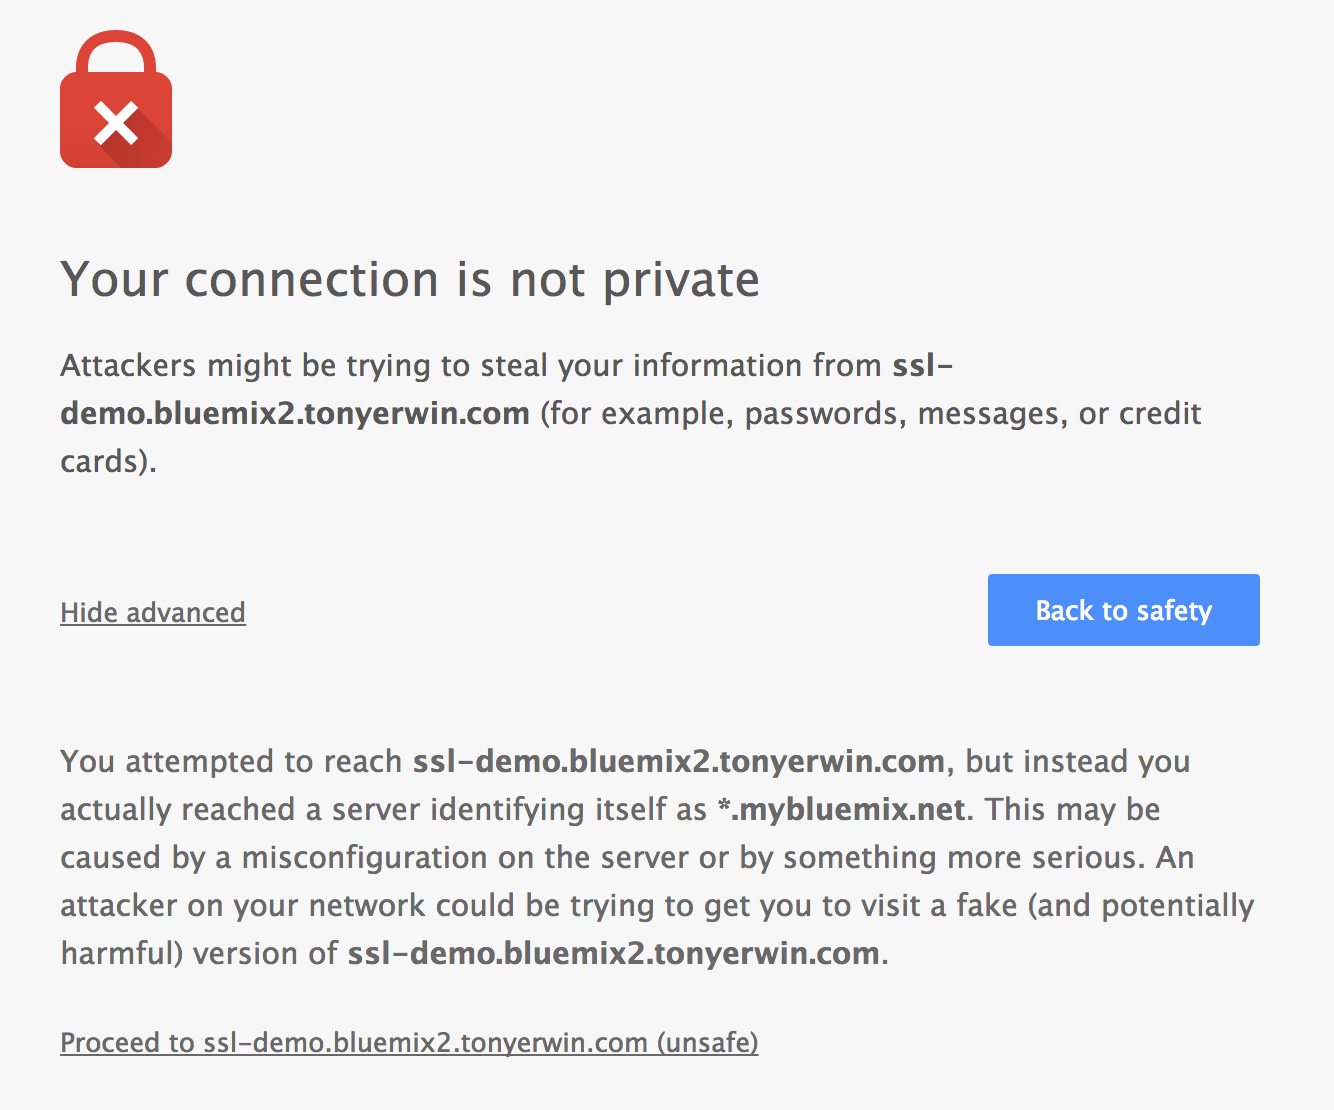
So, this finally brings us to the main point of this post — namely, eliminating that server mismatch by using your own certificate.

Time to Upload!

With that, let’s walkthrough the steps to upload your files (certificate, private key, and optional intermediate certificate) that you collected as part of the prerequisites:

  1. Go back to the Manage Domains tab where you first defined your custom domain.
  2. Find your domain in the table and click the Upload Certificate icon in the SSL Certificate column. Recall I pointed out this icon when you first created your custom domain.
  3. For each field on the Upload Certificate dialog, click the Choose button and select the appropriate file.
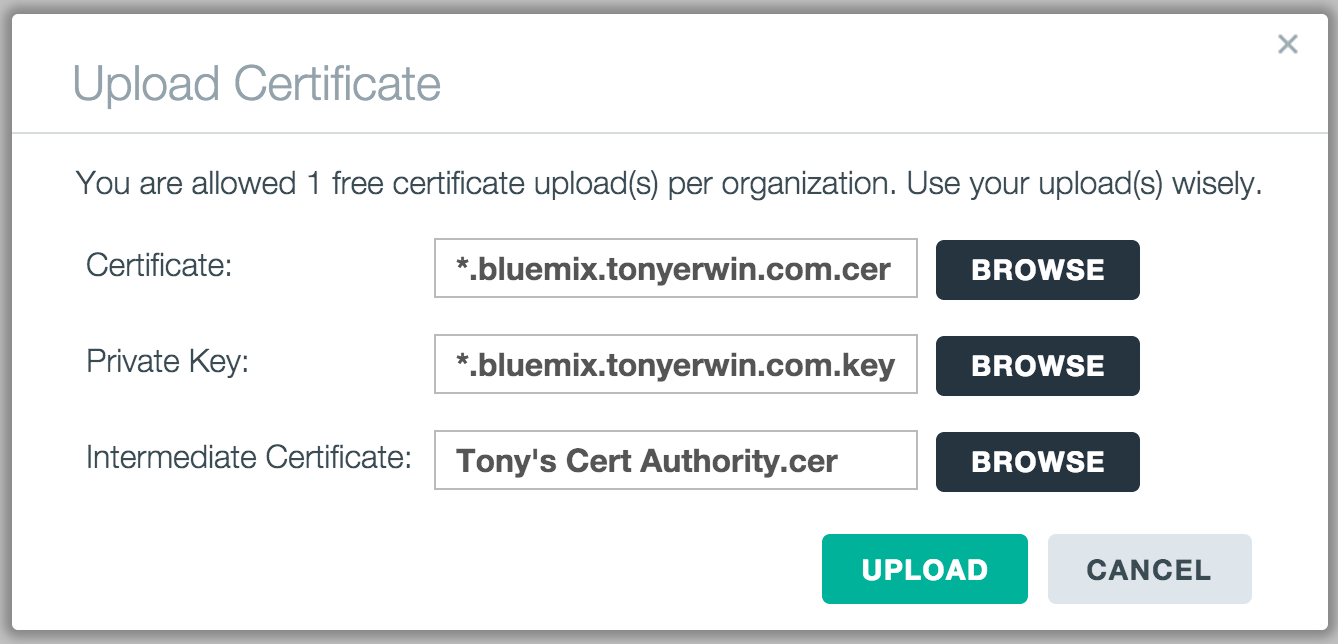
Bluemix UI: Upload Certificate Dialog (Populated)

  1. Click the Upload button and the upload process should begin. Once the upload is complete, the dialog will disappear and you will be taken back to the Manage Domains table. And, you should also see the icon for your domain has changed to a green padlock.

Bluemix UI: Manage Domains with SSL Uploaded

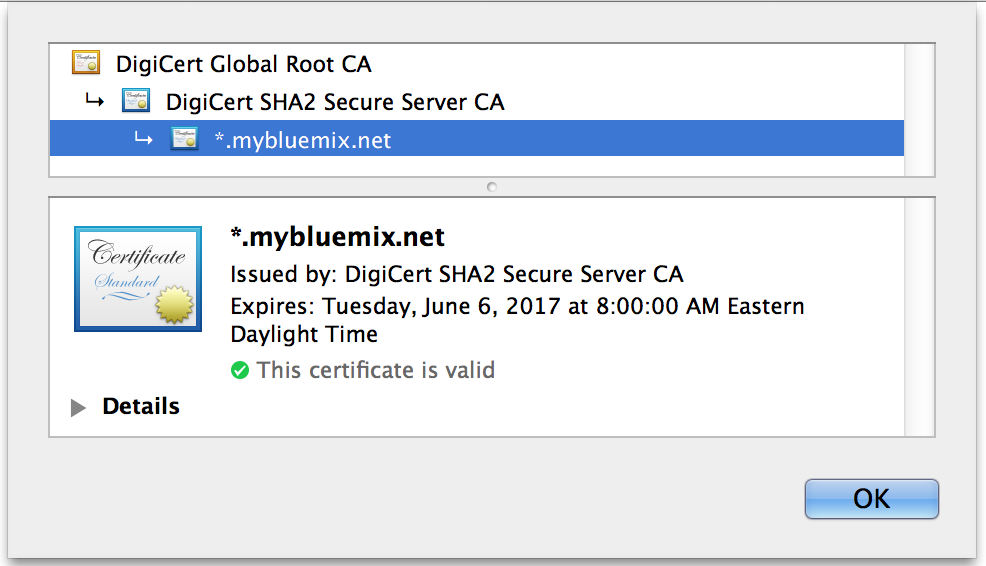
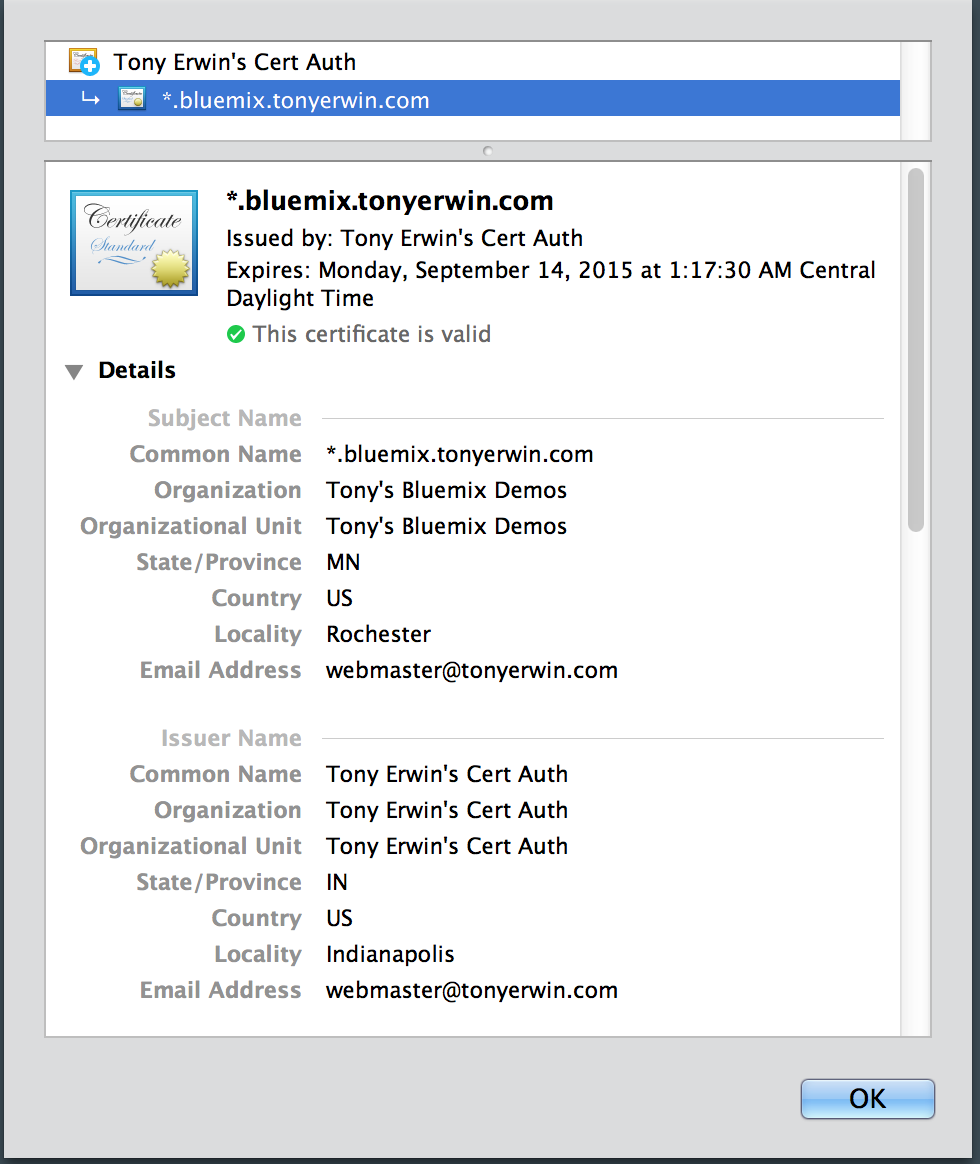
  1. If you click on the green padlock (which is the View Certificate icon), you will see a dialog much like the one below where you can see all of the important details about the certificate. Note that the dialog also contains buttons that allow you to Replace or Delete your uploaded files.

Bluemix UI: View Certificate

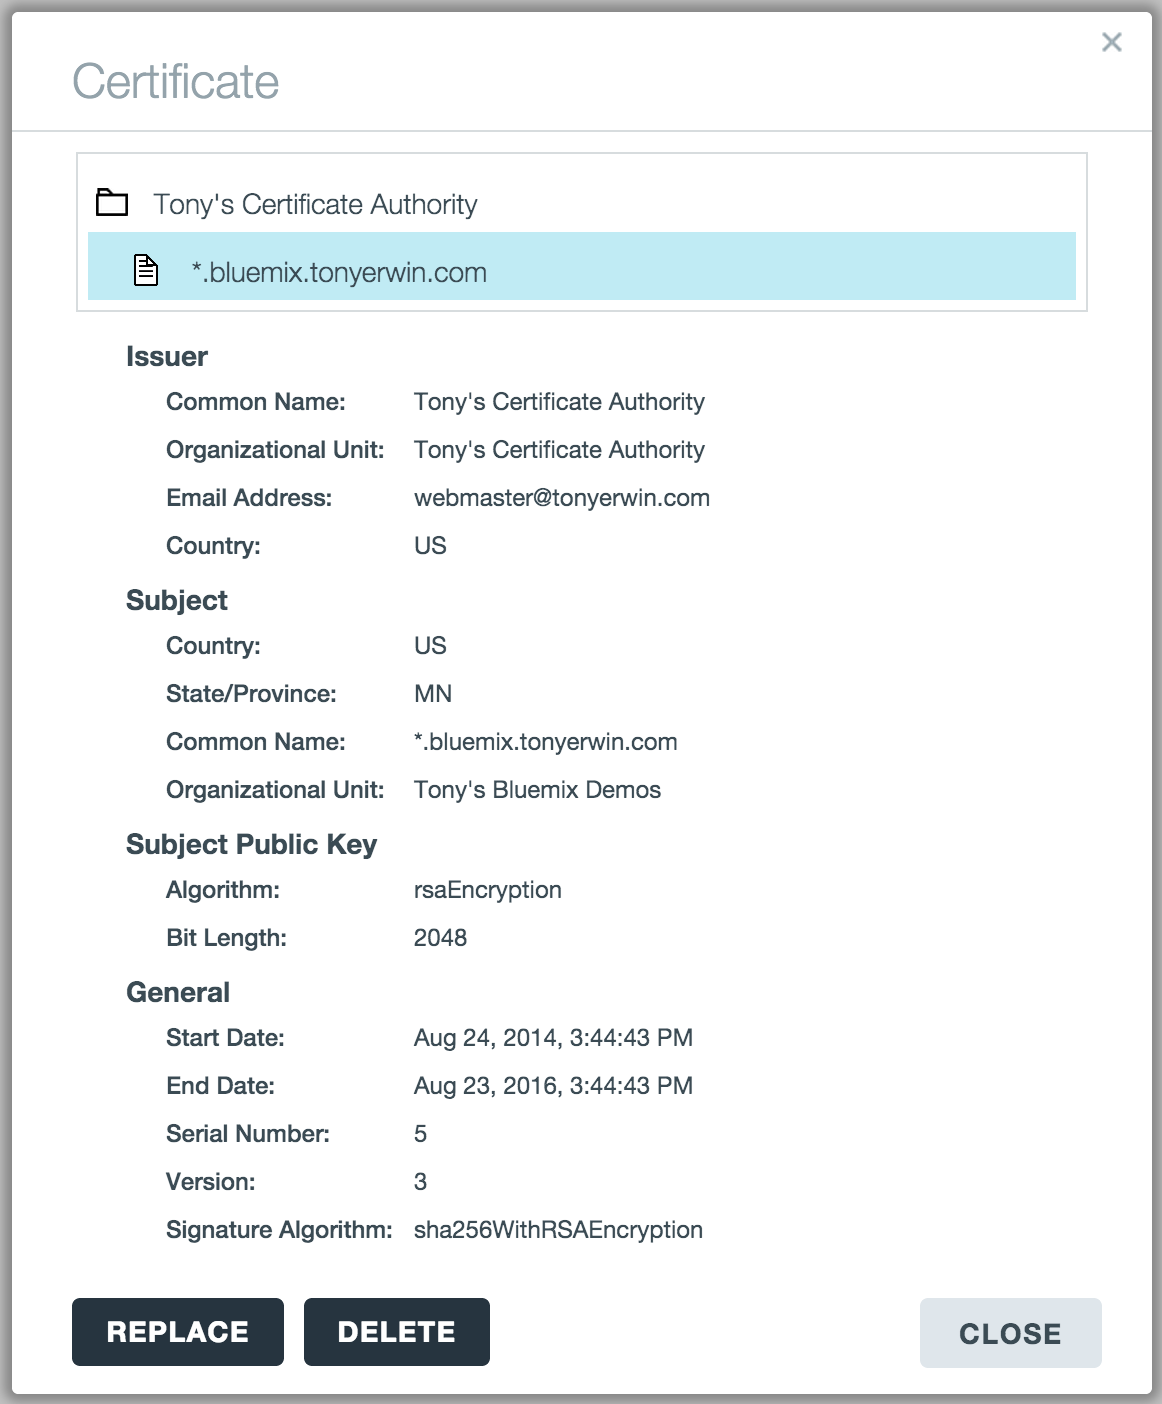
  1. If you also uploaded an intermediate certificate, you can click the root node of the certificate tree at the top of the dialog. This will show you all of the important information about the intermediate certificate.

Bluemix UI: View Certificate with Intermediate Selected

  1. Click the Close button on the View Certificate dialog.\
  2. Optionally, go back to the App Details view for your app and again bring up the Edit Routes dialog. You should see a green padlock next to your route indicating it’s now secured by your uploaded files.
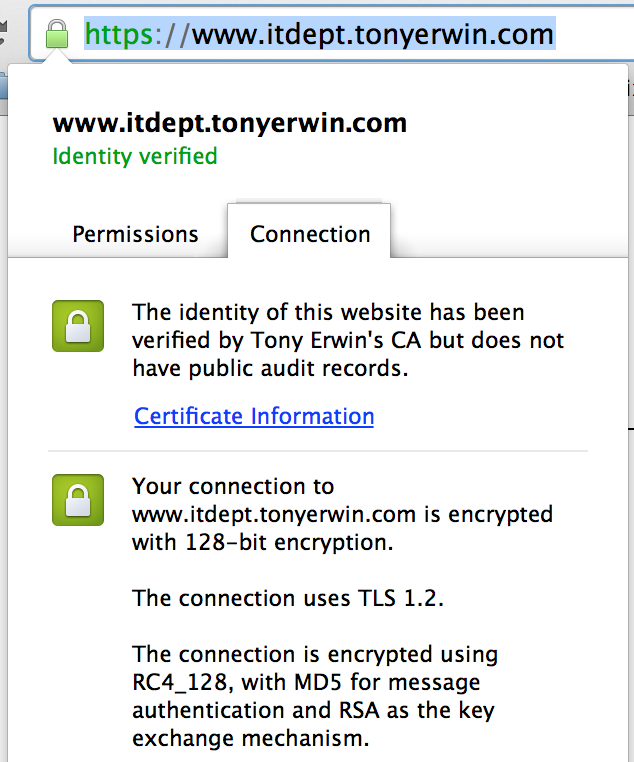
Bluemix UI: Edit Routes Dialog with Route Secured

Verify the Results

Now, if you try to access your route via the https protocol, the browser should declare your site is properly identified and trusted. For example, the screenshot below shows the certificate details for my app from Chrome:

Bluemix UI: Chrome Details Trusted

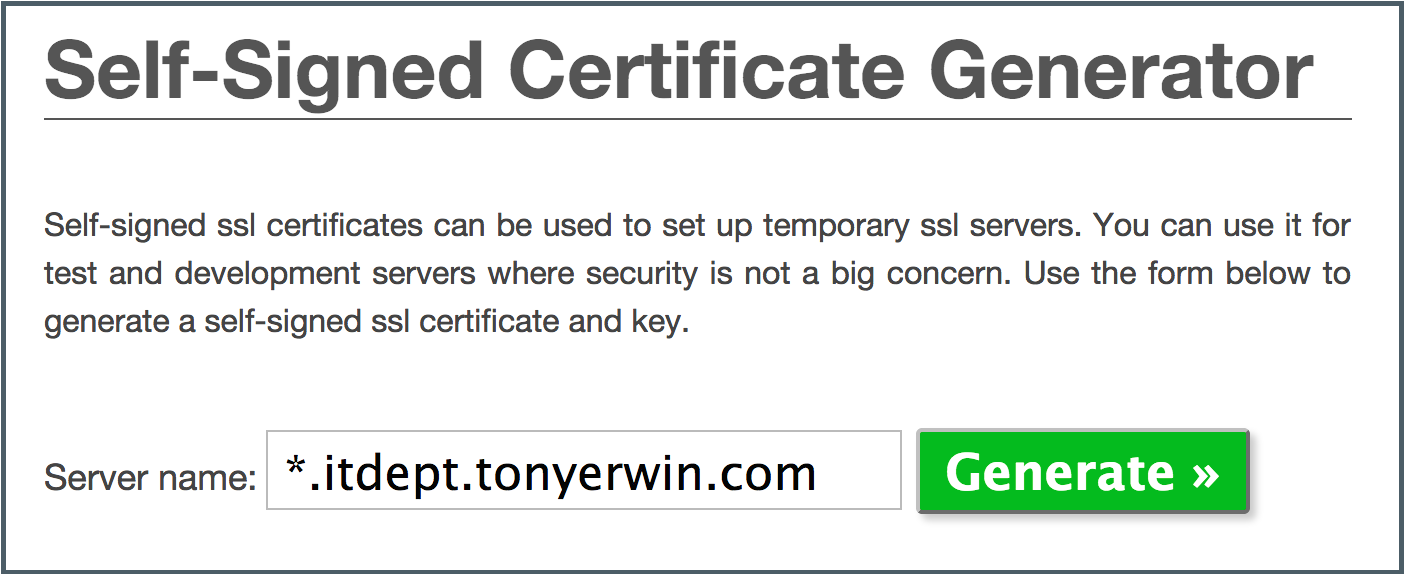
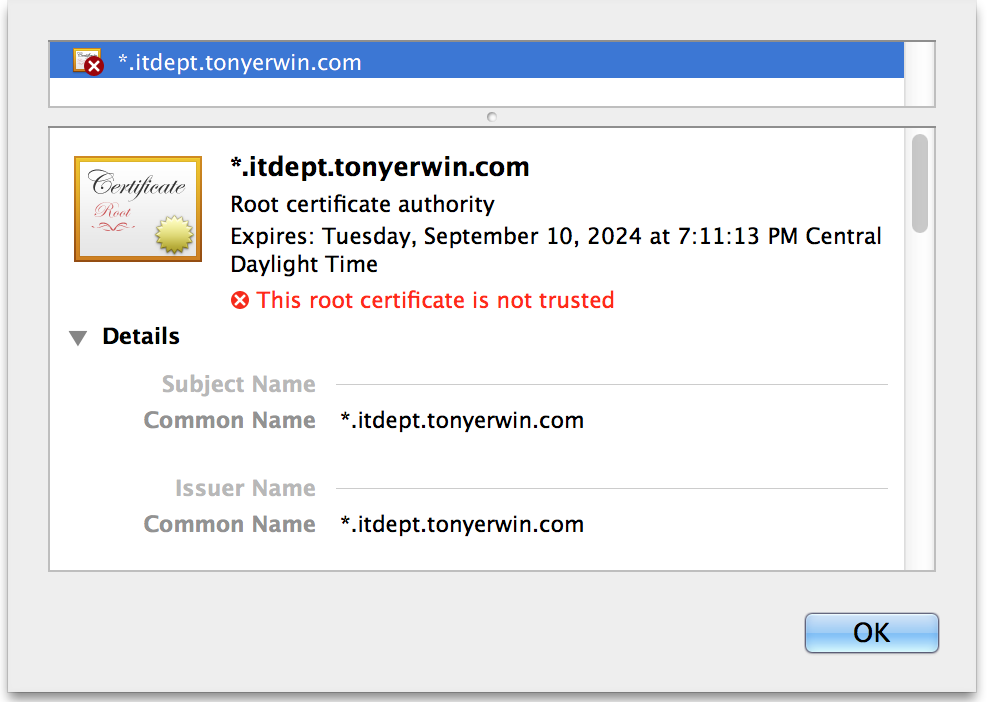
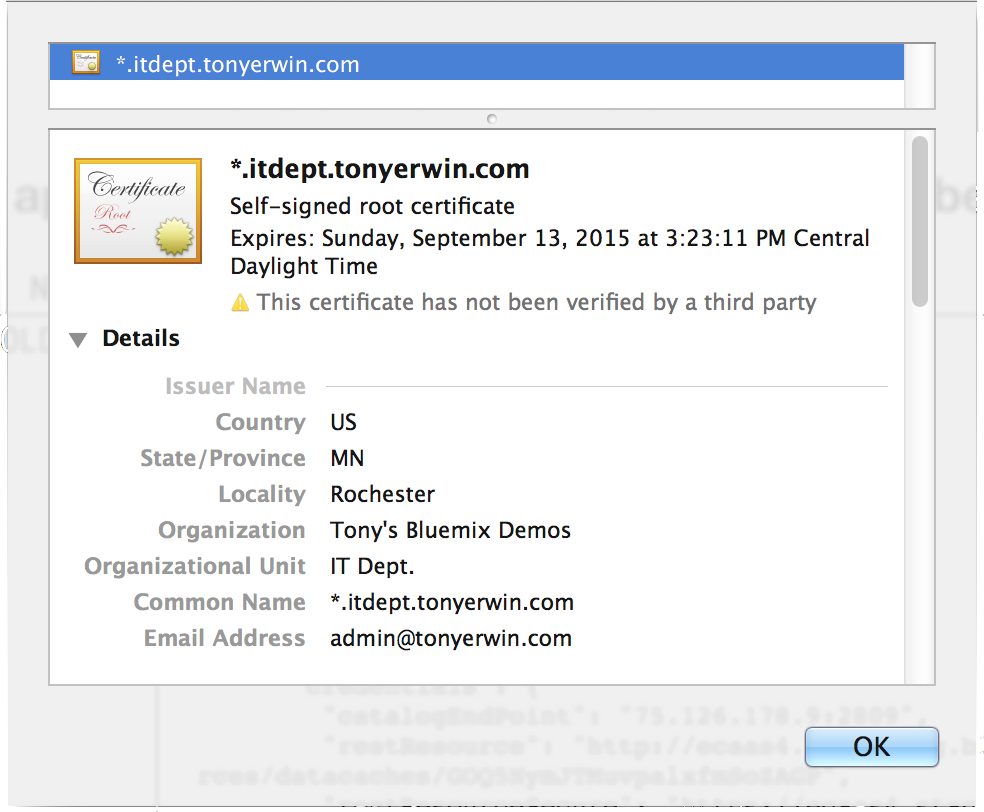
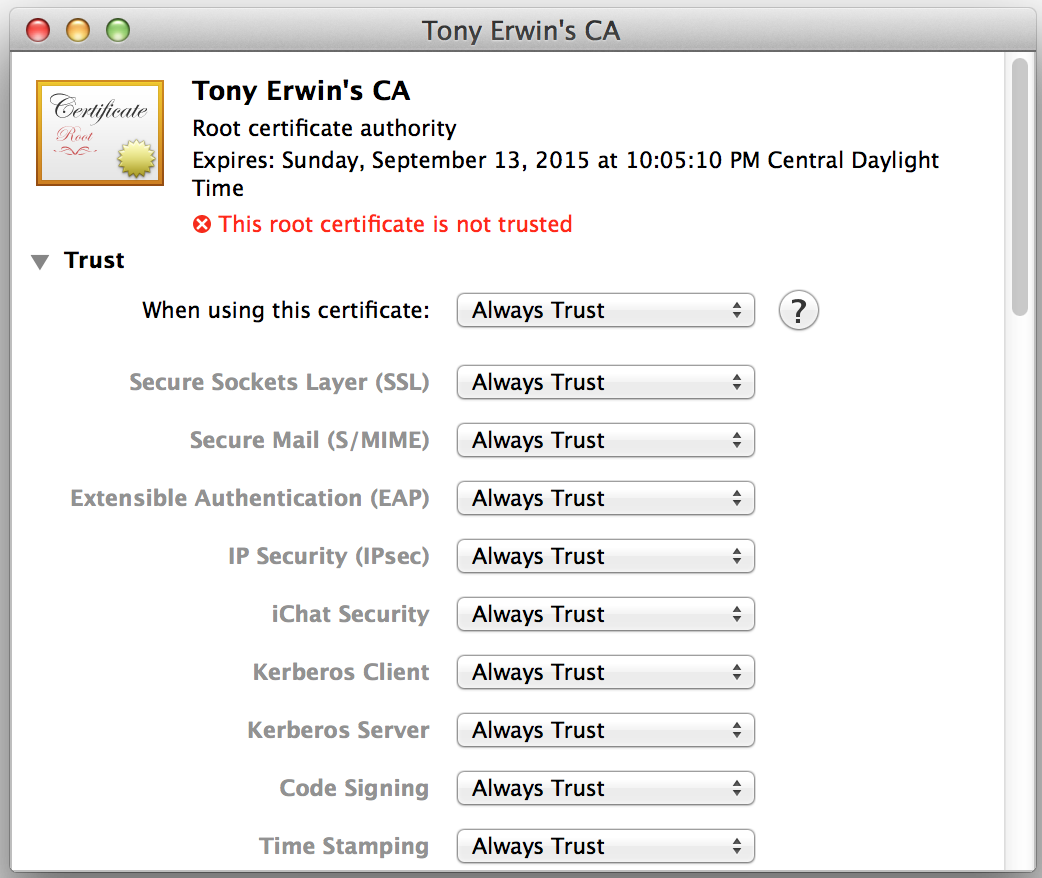
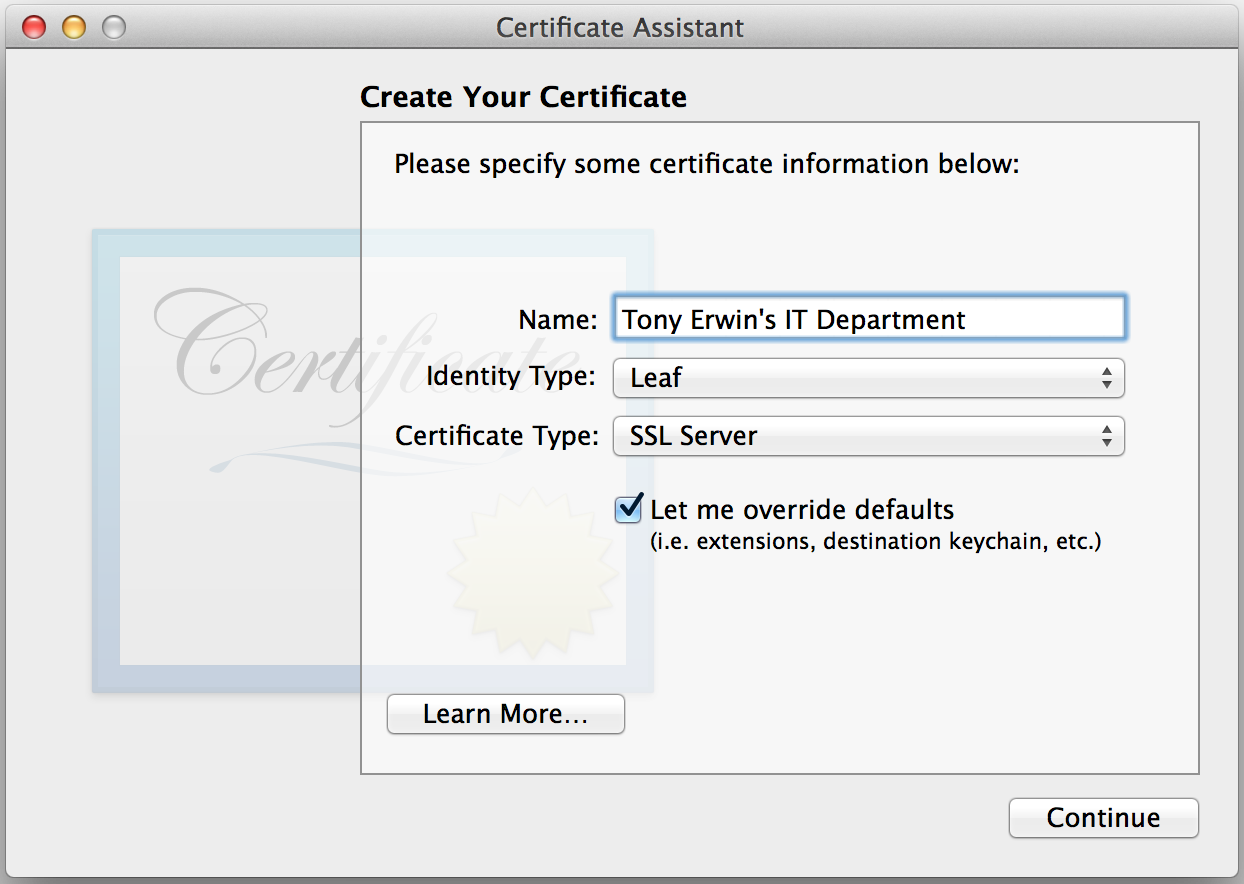
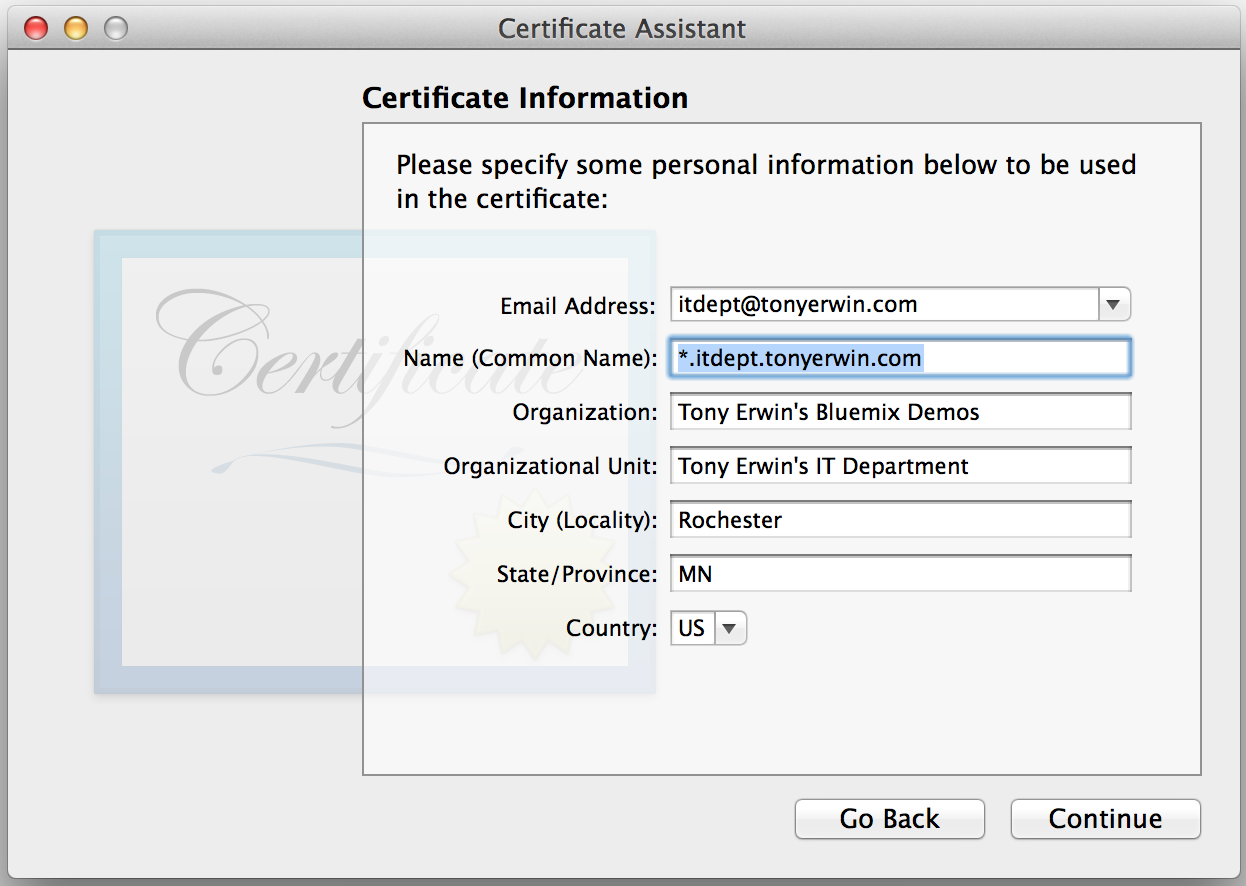
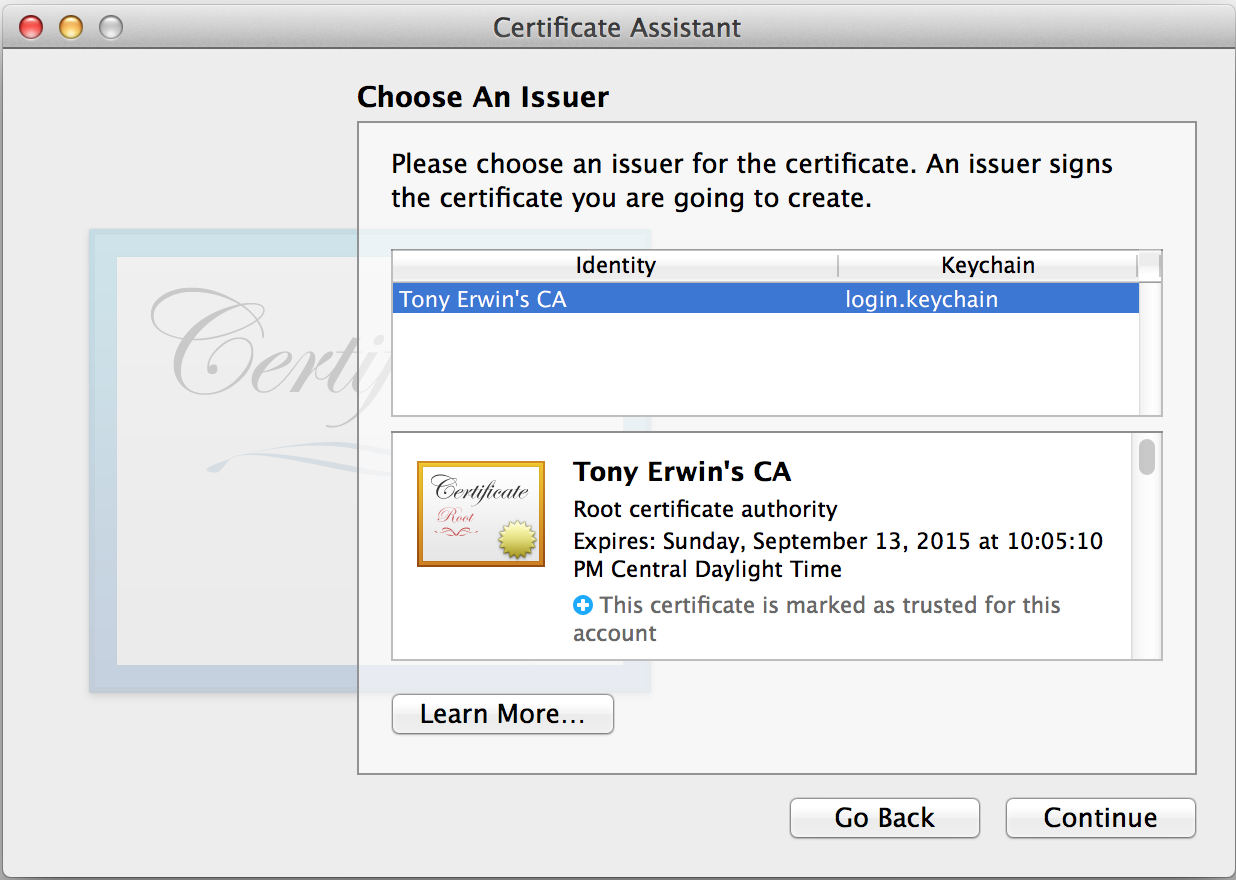
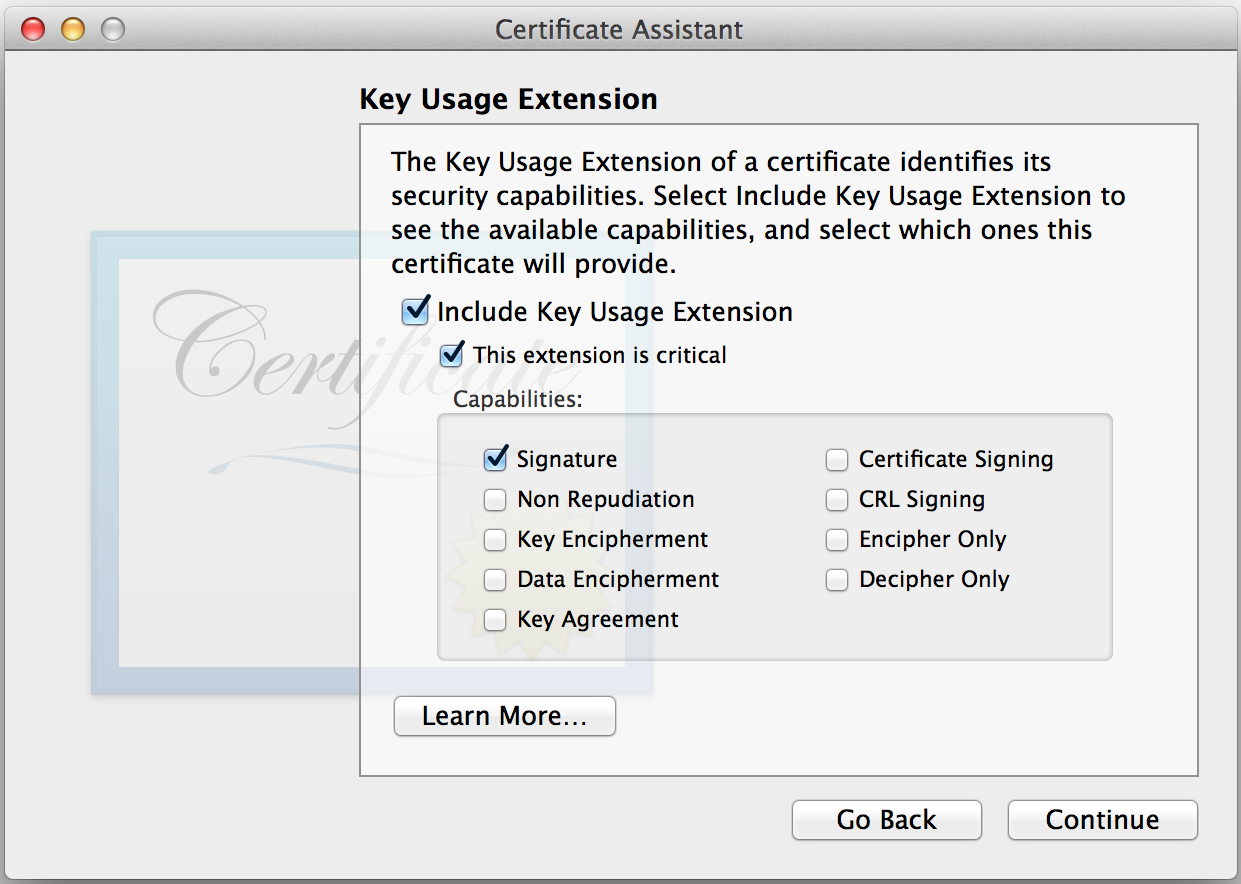
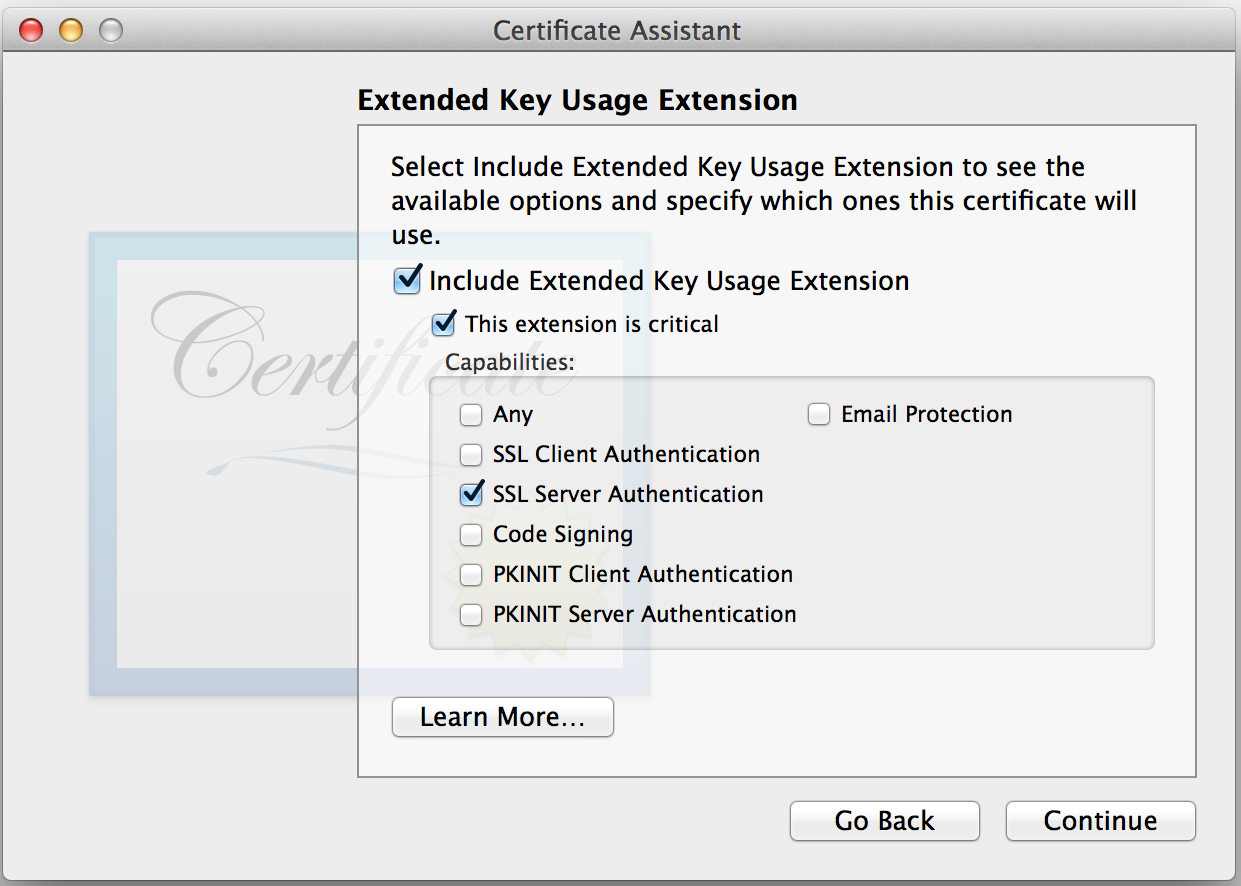
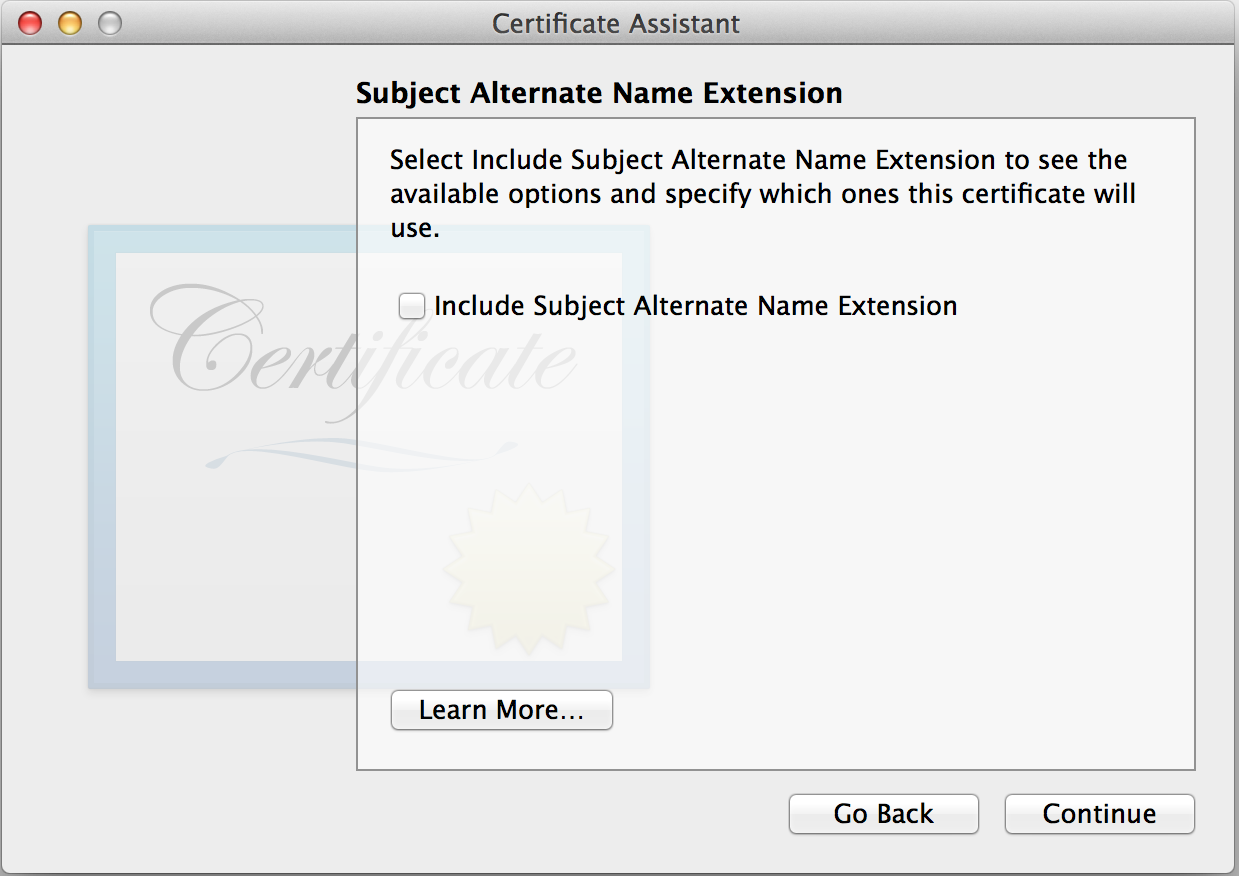
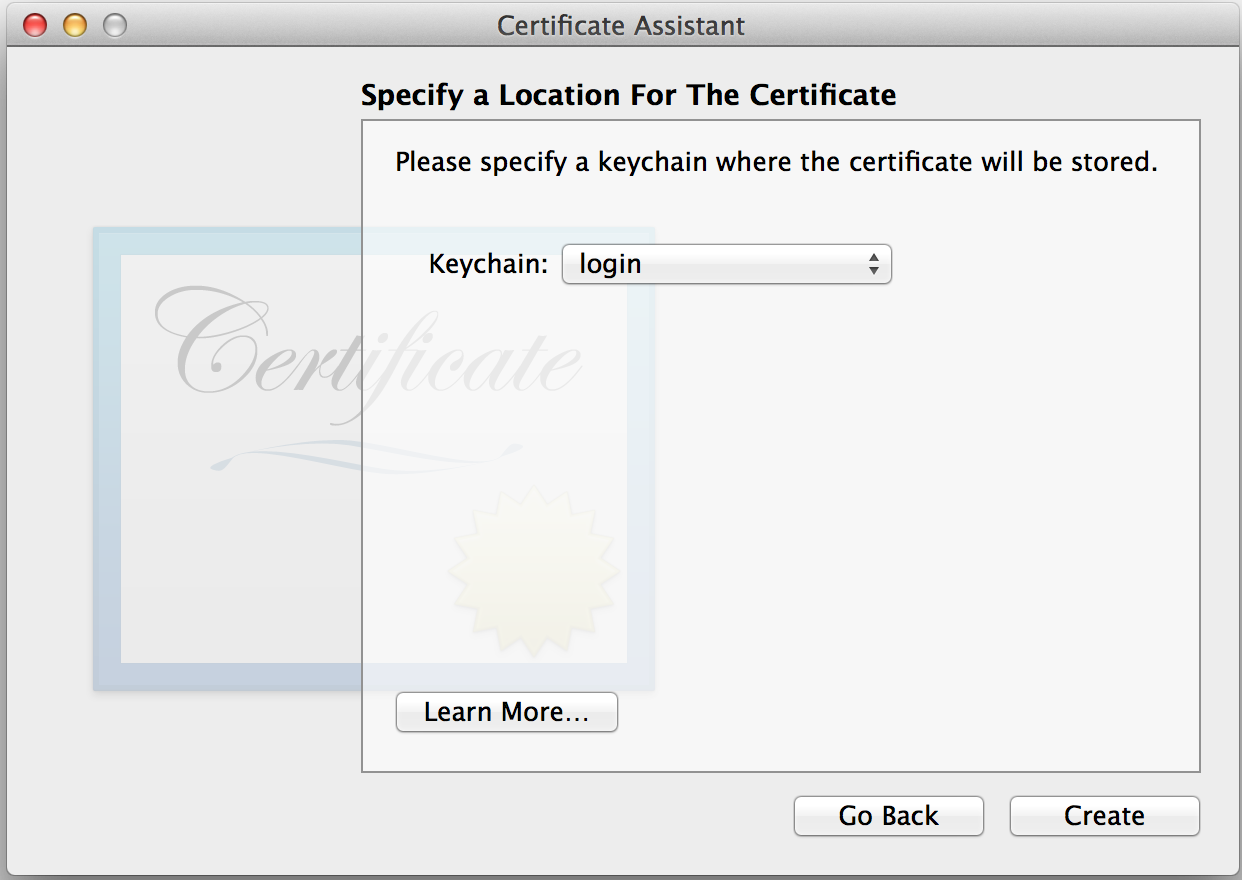
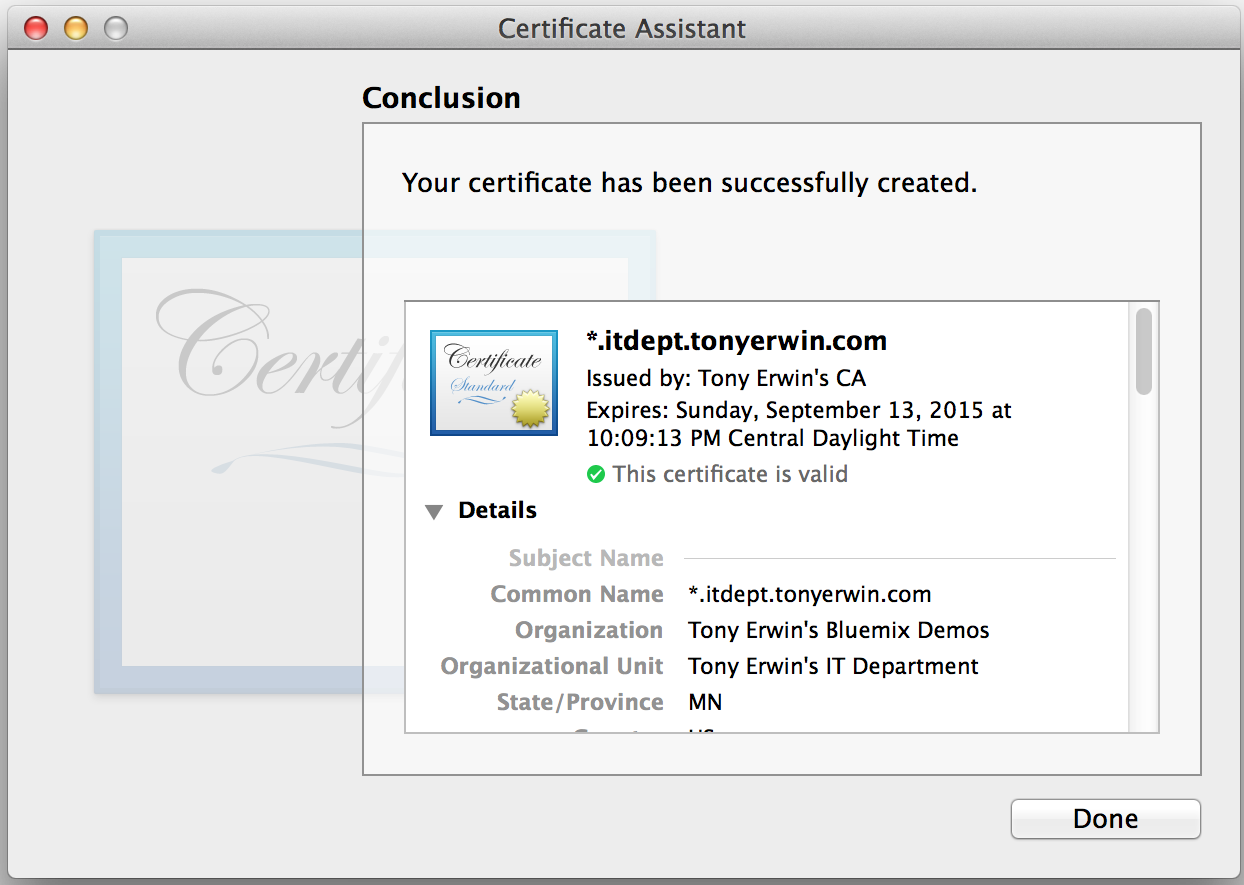
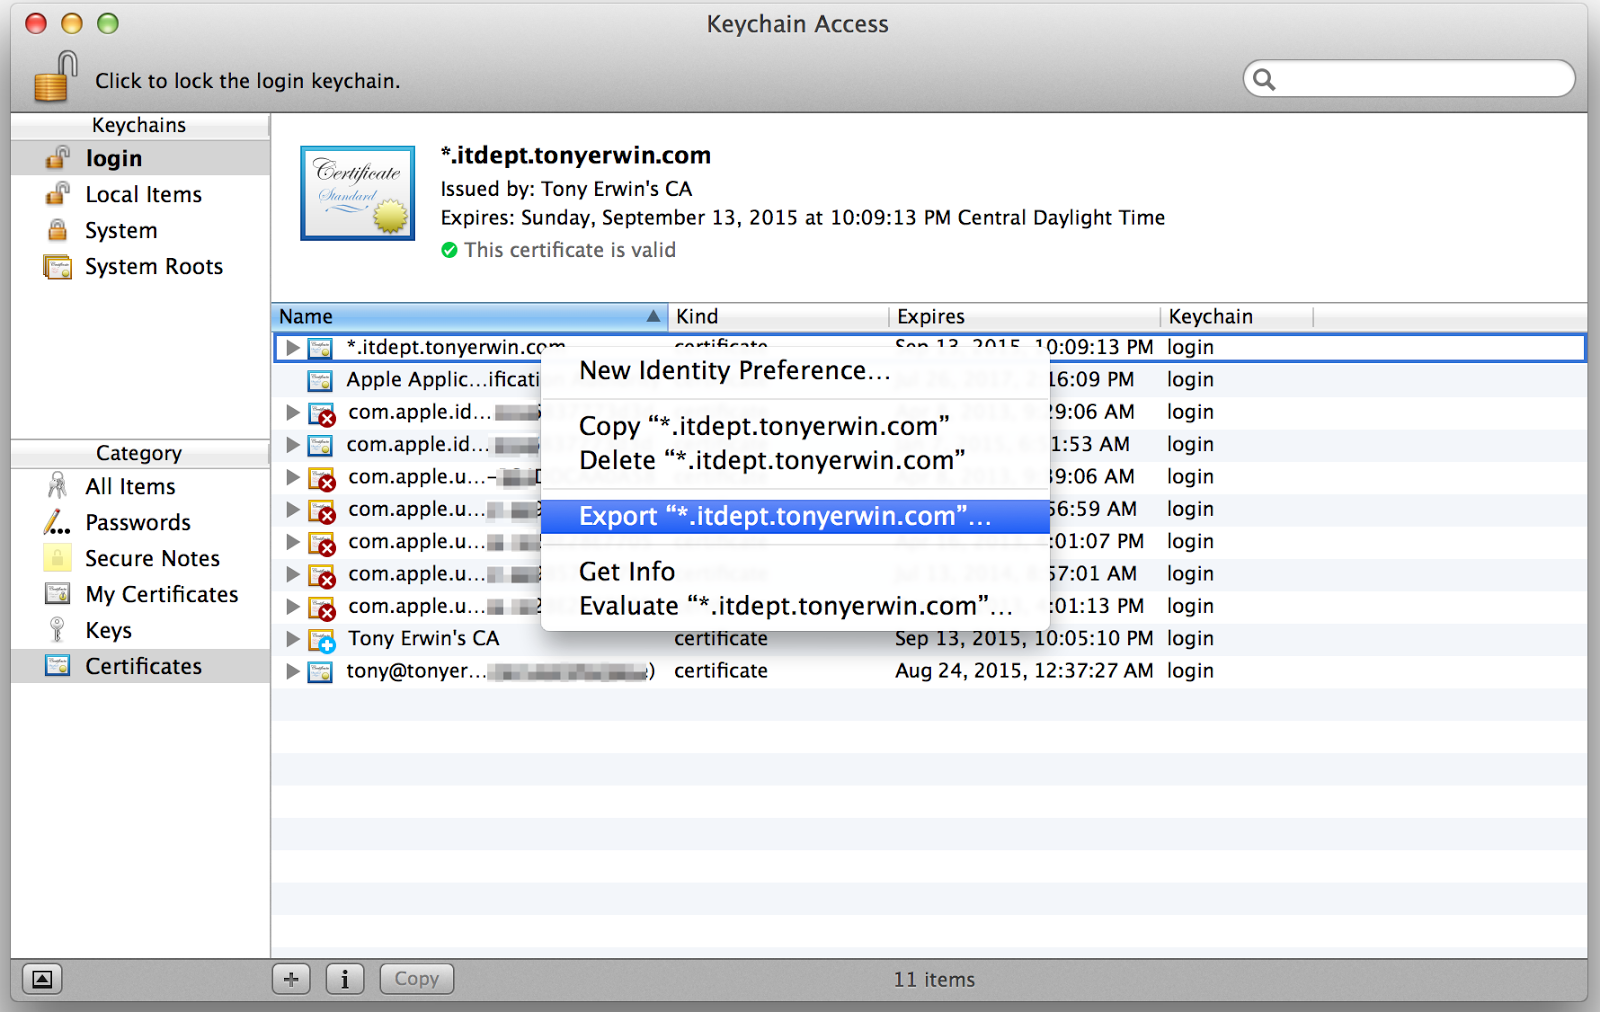
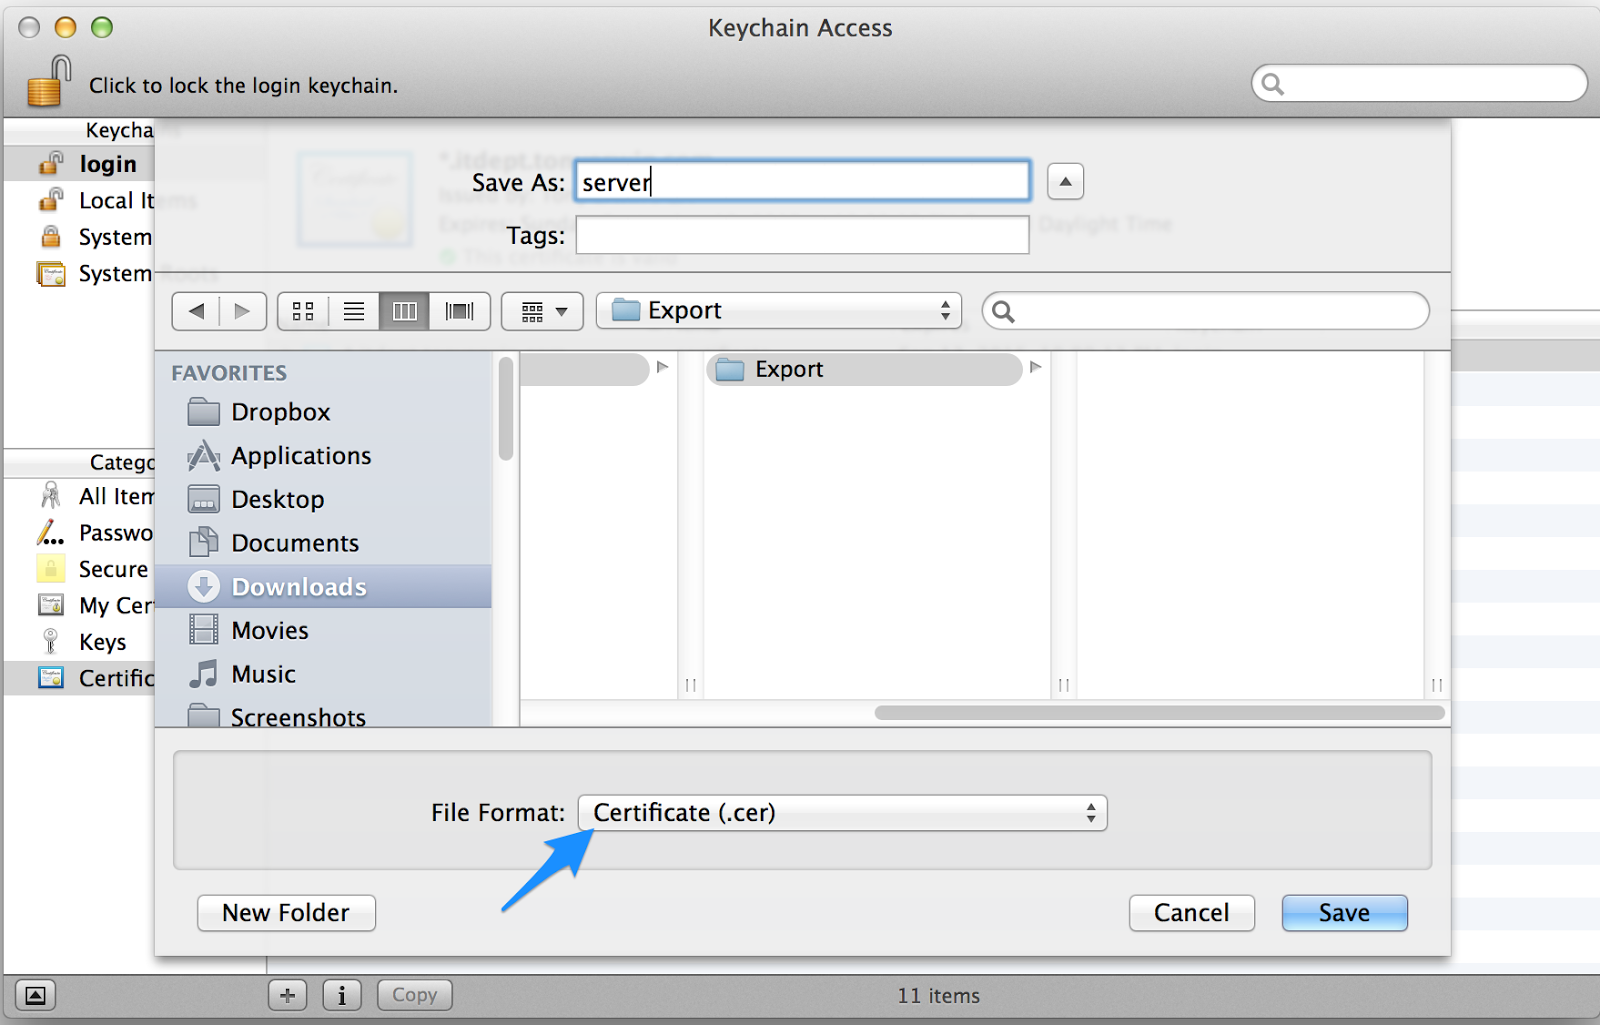
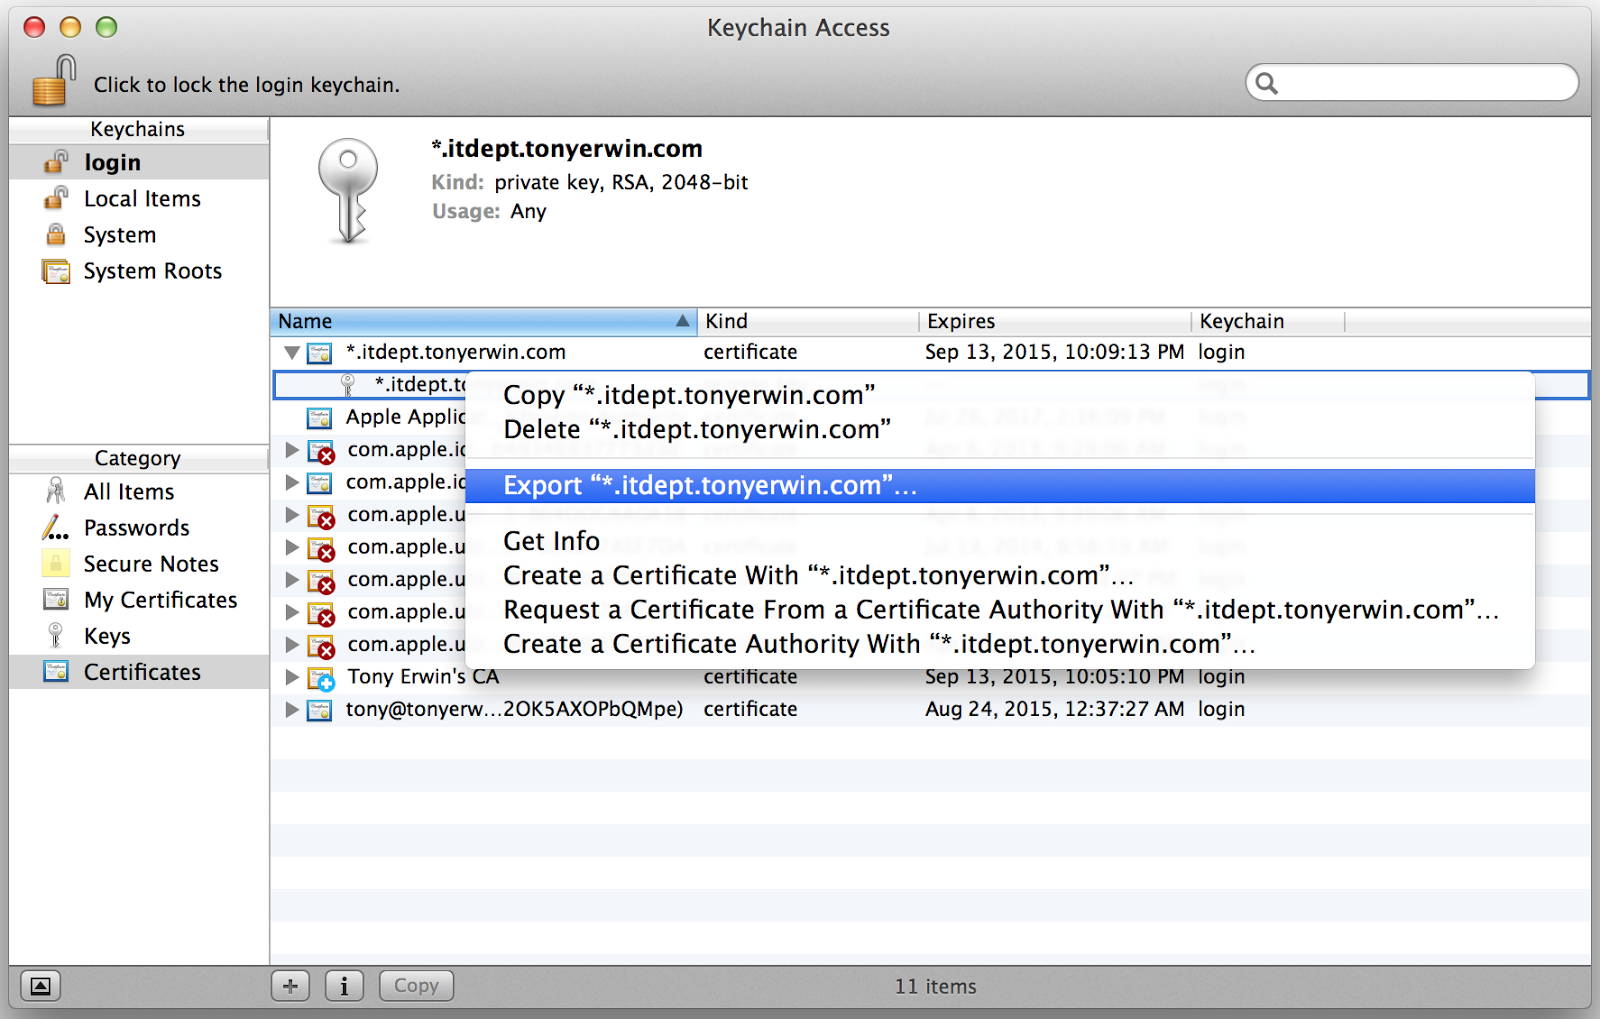
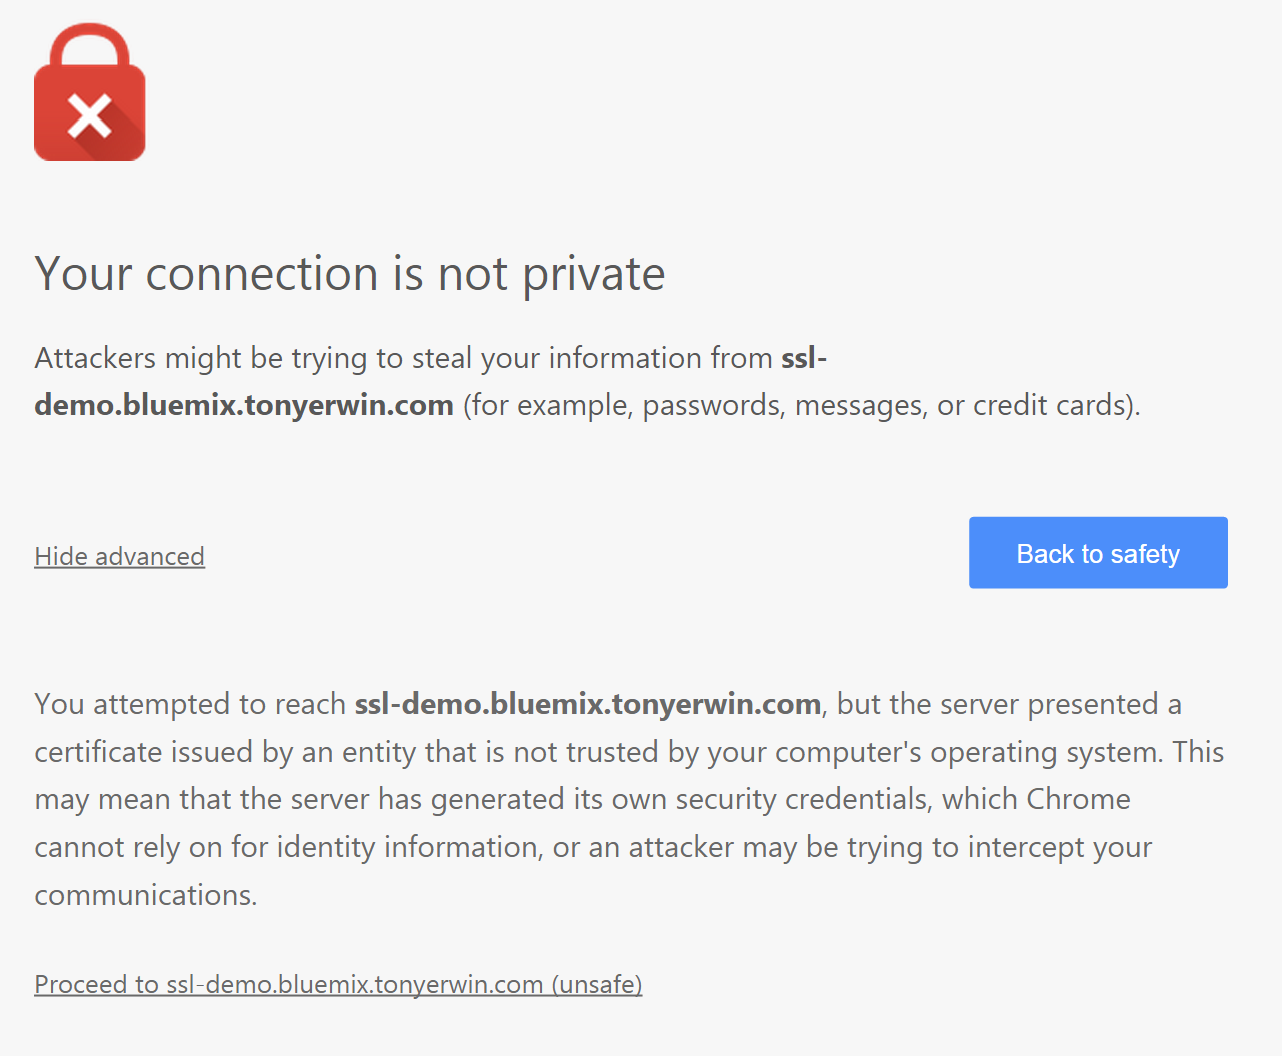
But, for full disclosure, if you visit my app (see https://ssl-demo.bluemix.tonyerwin.com), you’ll get a slightly different result because I didn’t actually get my certificates from a trusted certificate authority. Instead, I used Keychain Access on my Mac to generate a self-signed intermediate certificate. In addition, I configured the certificate to be trusted on my system. (If you’re interested, I described these steps in my other post on creating self-signed certificates.) Since my intermediate certificate is obviously not trusted on your system, you’ll see a browser warning if you try to access my app. The screen shot below shows the warning I see in Chrome if I try to access my app from another system. While there’s still an error, notice that it’s no longer a server mismatch error. Instead, Chrome tells me the certificate was issued by an entity not trusted by my computer.

Bluemix UI: Chrome Warning Non-Trusted

Redirecting HTTP to HTTPS

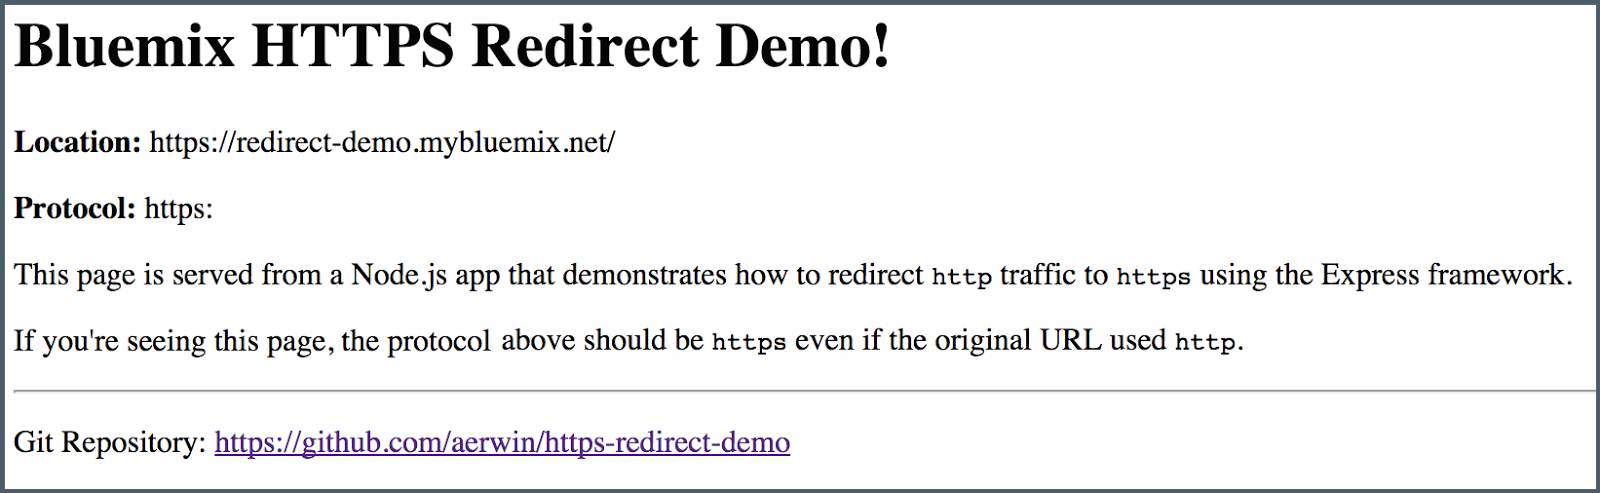
So, we’re in pretty shape now, but there’s one more important item to consider. In my previous post on redirecting http to https, I explained that unless you take steps (either in your app code or app configuration), unencrypted http traffic will still be allowed. You can see an example of that if you visit my live app using the http protocol at http://ssl-demo.bluemix.tonyerwin.com. In the other post, I go into the problem in much more detail, and I describe a sample Node.js app that demonstrates one approach to solving it. That sample is also running live using my custom domain (and certificates) at http://redirect-demo.bluemix.tonyerwin.com.

Conclusion

We covered a lot of ground in this tutorial as you learned all about Bluemix support for associating your certificates with custom domains. Along the way, you saw how to add a custom domain using the Bluemix UI, setup an app to use a custom domain in a route, configure DNS so your custom domain resolves to the IP address of the Bluemix router, and finally upload a certificate for a custom domain. I also briefly touched on some related issues (covered in more detail in other posts) such as generating self-signed certificates and redirecting http traffic to https.

Updated August 10, 2015: Remove mention that a certificate must be a wildcard certificate. That limitation is no longer in place.

"Generating Self-Signed SSL Certificates for Use with Bluemix Custom Domains

This is a companion piece to my Bluemix UI: SSL Certificates and Custom Domains post. It’s intended for Bluemix users who wish to use self-signed SSL certificates with their custom domains for testing and development. This can be useful before moving to production with a wildcard certificate issued by a trusted third-party certificate authority.

I’ll discuss three different approaches using:

Once you’ve generated a self-signed certificate using one of these approaches (or by one of the many approaches found doing a Google search, please see my previously mentioned post to learn how to associate it with a Bluemix custom domain.

Online Self-Signed Certificate Generator

A really straightforward way to generate a self-signed certificate is the online Self-Signed Certificate Generator. All you have to do is enter a wildcard domain and hit the Generate button.

Entering Domain in Online Self-Signed Certificate Generator

The site then uses OpenSSL in the background to generate a certificate and private key. After the process completes, you will see two links: one allows you to download a cert file and the other a key file. Download the files, and then you can use the Bluemix UI to upload and associate them with your domain.

I did this myself for one of my domains. When I accessed the app in Chrome, it provided me with the certificate details shown below. As you can see, the generated certificate only has the Common Name field filled in. And, of course, Chrome doesn’t trust it.

Browser Info For Cert Generated by Online Self-Signed Certificate Generator

Using OpenSSL to Generate Self-Signed Certificate

If you want more control over the generated certificate, you can use the openssl command directly. It may already be installed on your system, but if not, you should be able to install it. The steps below are adapted from the first 4 steps of How to Create a Self-signed SSL Certificate by Akadia.com. That article gives additional background information and guidance that you may find useful.

  1. Generate a private key.
$ openssl genrsa -des3 -out server.key 1024
Generating RSA private key, 1024 bit long modulus
........++++++
.................................................++++++
e is 65537 (0x10001)
Enter pass phrase for server.key:<br />Verifying - Enter pass phrase for server.key:
  1. Generate a CSR (Certificate Signing Request). For use with Bluemix, the most important thing to remember is to specify a wildcard domain for the Common Name field. I’ve highlighted the openssl prompt for that in the console output below.
$ openssl req -new -key server.key -out server.csr
Enter pass phrase for server.key:
You are about to be asked to enter information that will be incorporated<br />into your certificate request.
What you are about to enter is what is called a Distinguished Name or a DN.
There are quite a few fields but you can leave some blank
For some fields there will be a default value,
If you enter '.', the field will be left blank.
-----
Country Name (2 letter code) [AU]:US
tate or Province Name (full name) [Some-State]:MN
Locality Name (eg, city) []:Rochester
Organization Name (eg, company) [Internet Widgits Pty Ltd]:Tony's Bluemix Demos
Organizational Unit Name (eg, section) []:IT Dept.
Common Name (e.g. server FQDN or YOUR name) []:*.itdept.tonyerwin.com< <-- must be wildcarded
Email Address []:[email protected]

Please enter the following 'extra' attributes
to be sent with your certificate request
A challenge password []:
An optional company name []:
  1. Remove the passphrase from key.
$ cp server.key server.key.org
$ openssl rsa -in server.key.org -out server.key
Enter pass phrase for server.key.org:
writing RSA key
  1. Generate a self-signed certificate.
$ openssl x509 -req -days 365 -in server.csr -signkey server.key -out server.crt
Signature ok
subject=/C=US/ST=MN/L=Rochester/O=Tony's Bluemix Demos/OU=IT Dept./CN=*.itdept.tonyerwin.com/[email protected]
Getting Private key

At the end of this process, you’ll have two files: server.crt and server.key. Like before, these files can be uploaded via the Bluemix UI. The screenshot below shows the details as provided by Chrome when I access my app. The certificate is still untrusted, but you can see many more fields are populated with data.

Browser Info For Cert Generated by OpenSSL

If you want to go deeper with openssl, you can even generate your own intermediate certificates and use them to sign your main certificate. For example, see the article How to act as your own certificate authority (CA) by Jamie Nguyen.

Using Keychain Access on Mac to Be Your Own Certificate Authority

Depending on your platform, you may have graphical tools at your disposal to create and manage certificates. For example, on a Mac you can use Keychain Access. In the rest of this section, I’ll walk you through using Keychain Access on Mac OS X (Version 10.9.4) so you can act as your own certificate authority. You’ll first create a self-signed intermediate certificate which you’ll mark as trusted. You’ll then use this trusted intermediate certificate to issue a new certificate specific to your domain. Finally, you’ll export the files from Keychain Access and upload them to Bluemix. After that, you should see no SSL security warnings when accessing your web app from a browser on your local system.

Create Your Own Certificate Authority

First, follow the steps below to create a new certificate authority:

  1. Launch Keychain Access.
  2. Choose the Keychain Access -> Certificate Assistant -> Create a Certificate Authority… menu option.
  3. On the resulting dialog:
    • Fill in the Name field.
    • Ensure the Identity Type select box is set to Self Signed Root CA.
    • Leave User Certificate set to S/MIME Email or change to SSL Server.
    • Leave Let me override defaults unchecked.
    • Optionally uncheck Make this CA the default.
    • Specify a value for Email from.

Keychain Access: Create Certificate Authority

  1. Click the Create button.
  2. Close the dialog which says Conclusion and tells you creation was successful.
  3. Within the main Keychain Assistant window, find your new certificate and open it (either double-click on it or invoke the Get Info context menu item).
  4. On the resulting dialog, change the select box for When using this certificate to Always Trust.

Keychain Access: Trust New Certificate Authority

  1. Close the dialog. You will then be prompted for an administrator user name and password. After entering your credentials, click the Update Settings button.

You now have a self-signed certificate authority that is trusted by your local system.

Create Your Main Certificate

Next, you will create the main certificate for your domain. We will issue it using the trusted certificate authority you created in the previous section.

  1. In Keychain Access, choose the Keychain Access -> Certificate Assistant -> Create a Certificate… menu option to show the Create Certificate Wizard.
  2. On the first panel of the wizard:
    • Fill in the Name field.
    • Ensure the *Identity Type select box is set to Leaf.
    • Set the Certificate Type field to SSL Server.
    • Check the box next to the Let me override defaults option.

Keychain Access: Create New Certificate

  1. Click the Continue button.
  2. On the next panel, you can optionally adjust the Serial Number and Validity Period fields. Then, click the Continue button.
  3. You will then see a panel with a number of important attributes. Fill in all of the fields, but pay particular attention to the Name (Common Name) field. This field must be the wildcard version of the domain you wish to secure in Bluemix.

Keychain Access: Main Certificate Attributes

  1. Click the Continue button.
  2. You will then be given the option to choose the issuer for your new certificate. You will want to make sure to choose the certificate authority you created in the previous section.

Keychain Access: Choose Certificate Issuer

  1. Click the Continue button.
  2. On the next panel, you can leave the Key Size and Algorithm Fields alone. Then, click Continue.
  3. On the Key Usage Extension panel, you have a variety of options. The only item I enabled is the Signature field.

Keychain Access: Key Usage Extension

  1. Click the Continue button.
  2. On the Extended Key Usage Extension panel, check the box next to the SSL Server Authentication Option.

Keychain Access: Extended Key Usage Extension

  1. Click the Continue button.
  2. For the Basic Constraints Extension panel, you can leave the checkbox unchecked and then click the Continue button.
  3. For the Subject Alternate Name Extension panel, uncheck the box next to the Include Subject Alternate Name Extension field.

Keychain Access: Subject Alternate Name Extension

  1. Click the Continue button to arrive at the Specify a Location for the Certificate panel. You can leave the Keychain field set to login.

Keychain Access: Specify a Location for the Certificate

  1. Click the Create button and the Conclusion panel will be made visible. You should see a summary of the information for your new certificate.

Keychain Access: Create Certificate Conclusion

  1. Click Done.

Export Certificates

Now, you have created a certificate authority and used it to issue a new certificate. The next thing you need to do is export the files from Keychain Assistant so you can upload them to Bluemix:

  1. In the main Keychain Assistant window, find your main certificate. In the context menu, choose the Export option.

Keychain Access: Export Main Certificate

  1. You then get to choose the location for your exported certificate. You can choose whatever you want for filename (for example, server), but it’s very important you choose Certificate (.cer) for the File Format.

Keychain Access: Export Main Certificate File Choose

  1. Click the Save button.
  2. Now, find your private key in the Keychain Assistant window. You will need to expand you main certificate to see it. Right-click on it and choose the Export option.

Keychain Access: Export Private Key

  1. You will then see a dialog asking for a password to use to protect your file. Enter a password and confirm it (also be sure to remember it for later!), and click OK.
  2. Next you will be asked for an administrator password for your system. After entering your credentials, click Allow.
  3. You will then be asked for a location for the exported key. You can enter a file name (for example, server), and you’ll want to pick the same directory you chose for your exported certificate. For File Format, choose Personal Information Exchange (.p12). Click Save.
  4. Next, find your certificate authority in Keychain Assistant. Like you did for your main certificate, choose the Export option from the context menu.
  5. You will now see another file chooser. I entered ca for the filename, but you can choose whatever you like. However, be sure to pick Certificate (.cer) for File Format. Make sure you’ve chosen the same directory you used for exporting the first two files, and click Save.

Convert Your Private Key

You’ve exported the required files, and you’re almost done! But, there’s one more important step. Because Bluemix does not yet support p12 key files, you will need to use openssl to do a quick conversion. If you’ve gotten this far, it should be pretty straightforward because openssl is installed on your Mac. Go to the command line and change to the directory where you exported all of your files. Then, execute the command below (which came from a StackOverflow post). If you chose server.p12 for your key file name, then you can execute the command as is. Otherwise, you will need to enter your personal file name. When it asks for a password, use the same password you specified to protect the private key file when you exported it.

$ openssl pkcs12 -in server.p12 -nocerts -nodes | openssl rsa > server.key
Enter Import Password:
MAC verified OK
writing RSA key

Final Result with Keychain Assistant

At this point, you should have a .cer file for your main certificate, a .key file for your private key, and a .cer file for your intermediate certificate. You can now use the Bluemix UI to upload those files and secure your own domain. I did this myself. And, when I access my app using Chrome on my personal Mac, I see the identity is verified and there are no security warnings. However, this is because we told Keychain Access to trust our self-signed certificate authority. So, of course, if someone tries to access the app from another system they will still get a security warning.

Chrome Details Using Trusted Self-Signed Intermediat

Conclusion

Self-signed certificates should never be used for production apps, but you’ve seen they have value for testing and development. I presented steps for three different approaches to creating self-signed certificates appropriate for use with your Bluemix apps. These included online generation, manually executing openssl commands, and using the Mac’s Keychain Access app. In the last case, you also saw how a self-signed intermediate certificate can be marked as “trusted” to eliminate browser security warnings when running locally. After using any of these approaches, you can upload the resulting certificate and key files using the Bluemix UI to associate them with a custom domain. See my other post for full details on how to do that.

Redirecting HTTP to HTTPS with Node.js on IBM Bluemix

Colleague Jeff Sloyer points out in his recent blog post, Inbound SSL in Bluemix, that an app using the default domain for IBM Bluemix (which is mybluemix.net) gets SSL support automatically. This means without taking any other action, the app is accessible via https and traffic is secured by a fully trusted certificate provided by IBM. However, if not careful, your app will continue to be accessible via http, which completely bypasses SSL. In this post, I’ll show code for a simple approach (which differs from Sloyer’s) to make a Node.js app redirect http requests to https by leveraging parts of the Express web app framework. In addition, I’ll touch on issues with custom domains that occur when using the built-in, default SSL certificate.

Taking a Closer Look at Default Behavior

To show what happens “out-of-the-box”, I’ve created an app in the Bluemix UI using the SDK for Node.js™ starter. You can access it for yourself via the links below (using either http or https):

In either case, you’ll see a web page like the following:

Screenshot of Node.js Starter App

However, when you use https, notice that the browser shows a lock icon in the address bar. And, if you dig into the certificate details, you should see something like the following (which happens to be from Chrome):

Certificate info for mybluemix.net

This indicates that the certificate for *.mybluemix.net was issued by DigiCert and is trusted. You can rest assured the web site is coming from a server running on mybluemix.net, and the data is encrypted. On the other hand, if you use http there is no certificate info, and web traffic is unencrypted.

Redirecting HTTP to HTTPS

Where Will It Run?

While the Node.js app has been tested only on Bluemix, it should also run anywhere the app is sitting behind a reverse proxy. In particular, since Bluemix is a Platform-as-a-Service (PaaS) built on top of the Cloud Foundry open source framework, I'd expect the code to run without change in any other Cloud Foundry-based environment.

If we want to guarantee all of our traffic uses SSL, we need to ensure http requests are redirected to https. I’ve written a small Node.js application demonstrating how to do this when running on Bluemix. The code makes use of the Express framework, and this really simplifies the work. The key components of the solution are:

  • Enabling trust proxy to turn on reverse proxy support
  • Using req.secure to determine if http or https was requested
    • NOTE: req.secure provides a shortcut to doing a string compare against req.protocol. The req.protocol flag is set by Express based on the X-Forwarded-Proto request header.

The full code listing is shown below. And, a complete package that can be deployed to Bluemix (including instructions on how to do so) is available on GitHub.

You can access a live Bluemix deployment of the code with the URLs below (one using http and one using https):

In both cases, you should see a page like the one below (and using https):

Screenshot of HTTPS Redirect Demo

Alternative Approach: Inspect X-Forwarded-Proto

In my code, I enabled trust proxy and then left most of the work to the Express framework. A slightly lower-level, “long hand” approach is described by Sloyer in his previously mentioned post. His code example is illustrative as he manually inspects the X-Forwarded-Proto request header. This gives a sense of what’s going on behind the scenes, and is especially useful if not using Express.

What About Custom Domains?

To this point, I’ve only been talking about URL’s using the default mybluemix.net domain. The reason is that if you use a custom domain, things don’t come together quite as smoothly. You still technically get https for free, but the browser will complain about a domain mismatch after inspecting the certificate.

To allow you to easily see this for yourself, I’ve added a route to the https-redirect-demo app which uses the tonyerwin.com domain:

If you follow that link, the redirect from http to https still occurs. But, your browser is going to tell you that you can’t trust the identity of the site. For example, here’s what I see in Chrome:

Security Warning in Chrome With Custom Domain

Basically, the same certificate that was present for the *.mybluemix.net domain is still being served, but its domain info doesn’t match my tonyerwin.com custom domain. So, Chrome tells me I should probably stay clear and not continue.

Clearly, you wouldn’t want this kind message appearing for your production apps. The only way to solve this problem is to upload an SSL certificate which matches *.tonyerwin.com. You can learn all about using your own SSL certificates in my post called Bluemix UI: SSL Certificates and Custom Domains.

Conclusion

In this post, you saw how both http and https is enabled for Bluemix apps using the default mybluemix.net domain. Then, you saw how a few lines of code in a Node.js app allows you to redirect all http requests to https (which then ensures data shared between your app and the user’s browser is trusted and encrypted). Finally, you learned that more work is needed to avoid SSL certificate errors when using https with a custom domain. The additional work to upload your own SSL certificates will be the subject of a follow-up post in the near future.

Updated, Sept. 15, 2014 to include link to my new post entitled “Bluemix UI: SSL Certificates and Custom Domains.”